Spreadsheets
The following sections describe how to use Spreadsheet in Scifeon. Spreadsheets are used to register, modify, and hold data in Scifeon.
Creating and Editing Spreadsheets
Section titled “Creating and Editing Spreadsheets”In the ELN click + Section (1) and select Spreadsheet, then after that the spreadsheet is added to the ELN.
Our Spreadsheet section works just like a very basic excel.
We support the following basic features directly from the Spreadsheet header -
- Undo & Redo - The option to undo and redo recent actions.
- Text Decorations – Size, colors, position and text formatting.
- Cell Styling – Merging cells and adding borders.
- Cell Locking – Locking and unlocking of cells to ensure they cannot be accidentally edited.
- Cell Validation – Rules to validate cells and clearly mark if something is wrong.
- Cell Typing – Change cell type to Standard, Number, Percent, or Text.
- Decimal Point – Easily change decimal point position.
- Import Excel – Import excel sheet directly into the ELN.
- Export Excel – Export your ELN Spreadsheet to excel or CSV.
- Full Screen mode – Expand the Spreadsheet to fill your whole screen.
- Save – The Spreadsheet section will automatically save after ~10 seconds, but you can manually save as well.

A Spreadsheet that has unsaved data in it will have a yellow line in the left side. This a general way to tell a section has unsaved data. (1)
As in a Excel you can use the standard function like AVERAGE(), SUM(), COUNT() etc. (2)
You can also have multiple sheet (3), and all sheets are connected throughout the ELN.

Inserting ELN data into Spreadsheets
Section titled “Inserting ELN data into Spreadsheets”It is possible to insert any data from the ELN into a Spreadsheet.
Here how to -
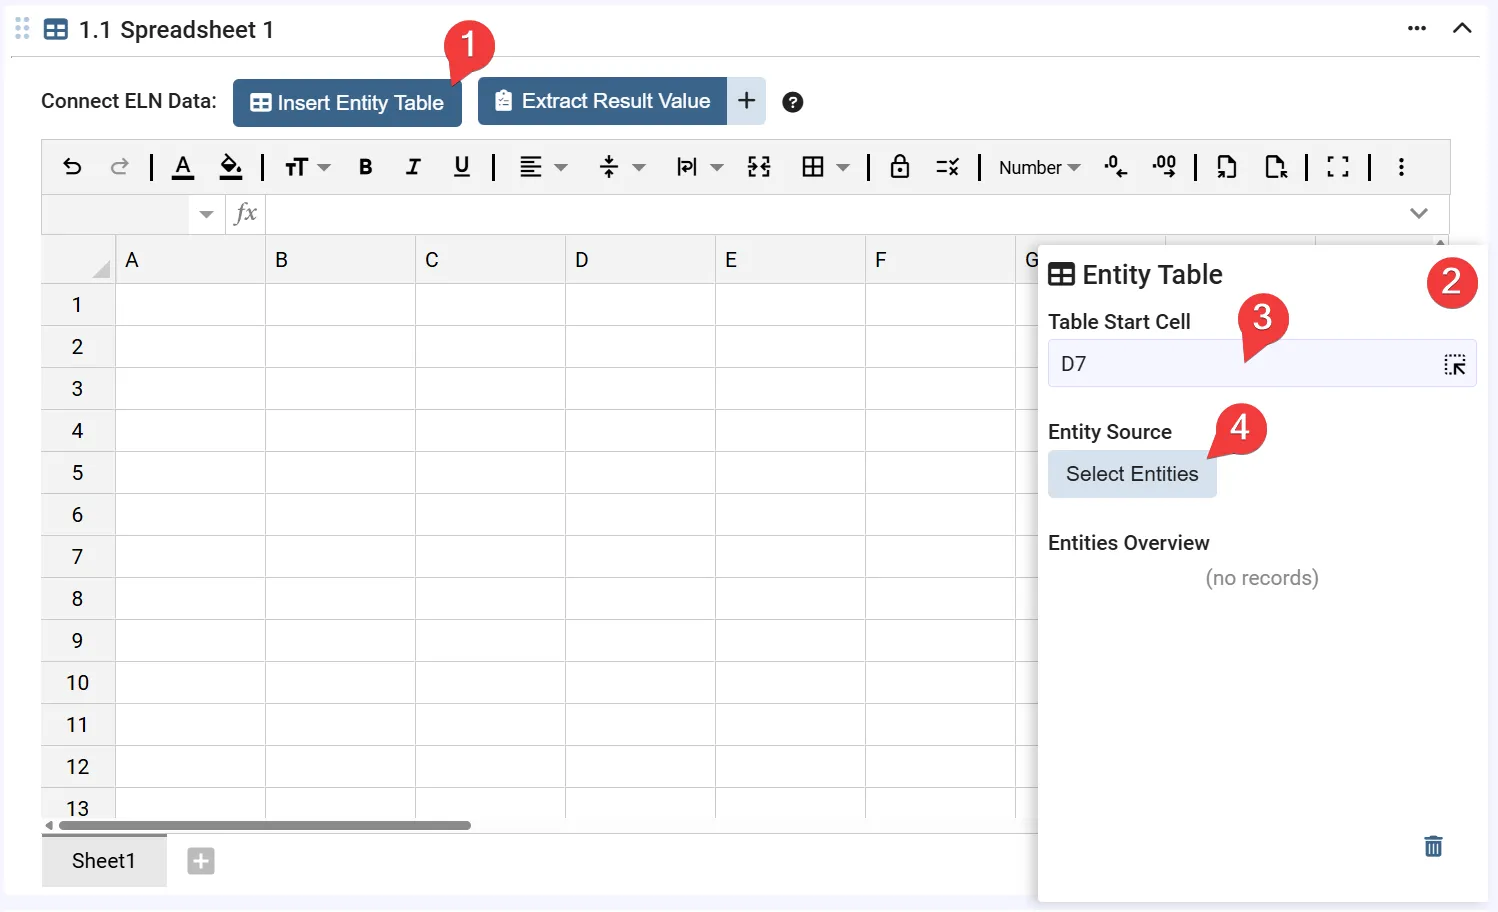
- Queries & Connections - Click the “Queries & Connections” button in the Spreadsheet toolbar.
- Configure table - A slide in modal will appear in the right side of the Spreadsheet.
- Set Table Start Cell - Select the cell from where the table should start from. You can either manually type this, or use the cell picker.
- Select an Entity Source - Click the “Select Entities” button.
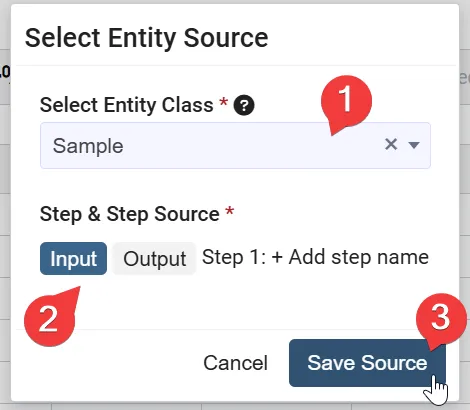
- Select Entity type - Select desired type e.g Samples, Batches, Animals or Fermentations
- Select Step Input/Output - The step where your entities are/will be located.
- Save Source - Save the selected configurations.
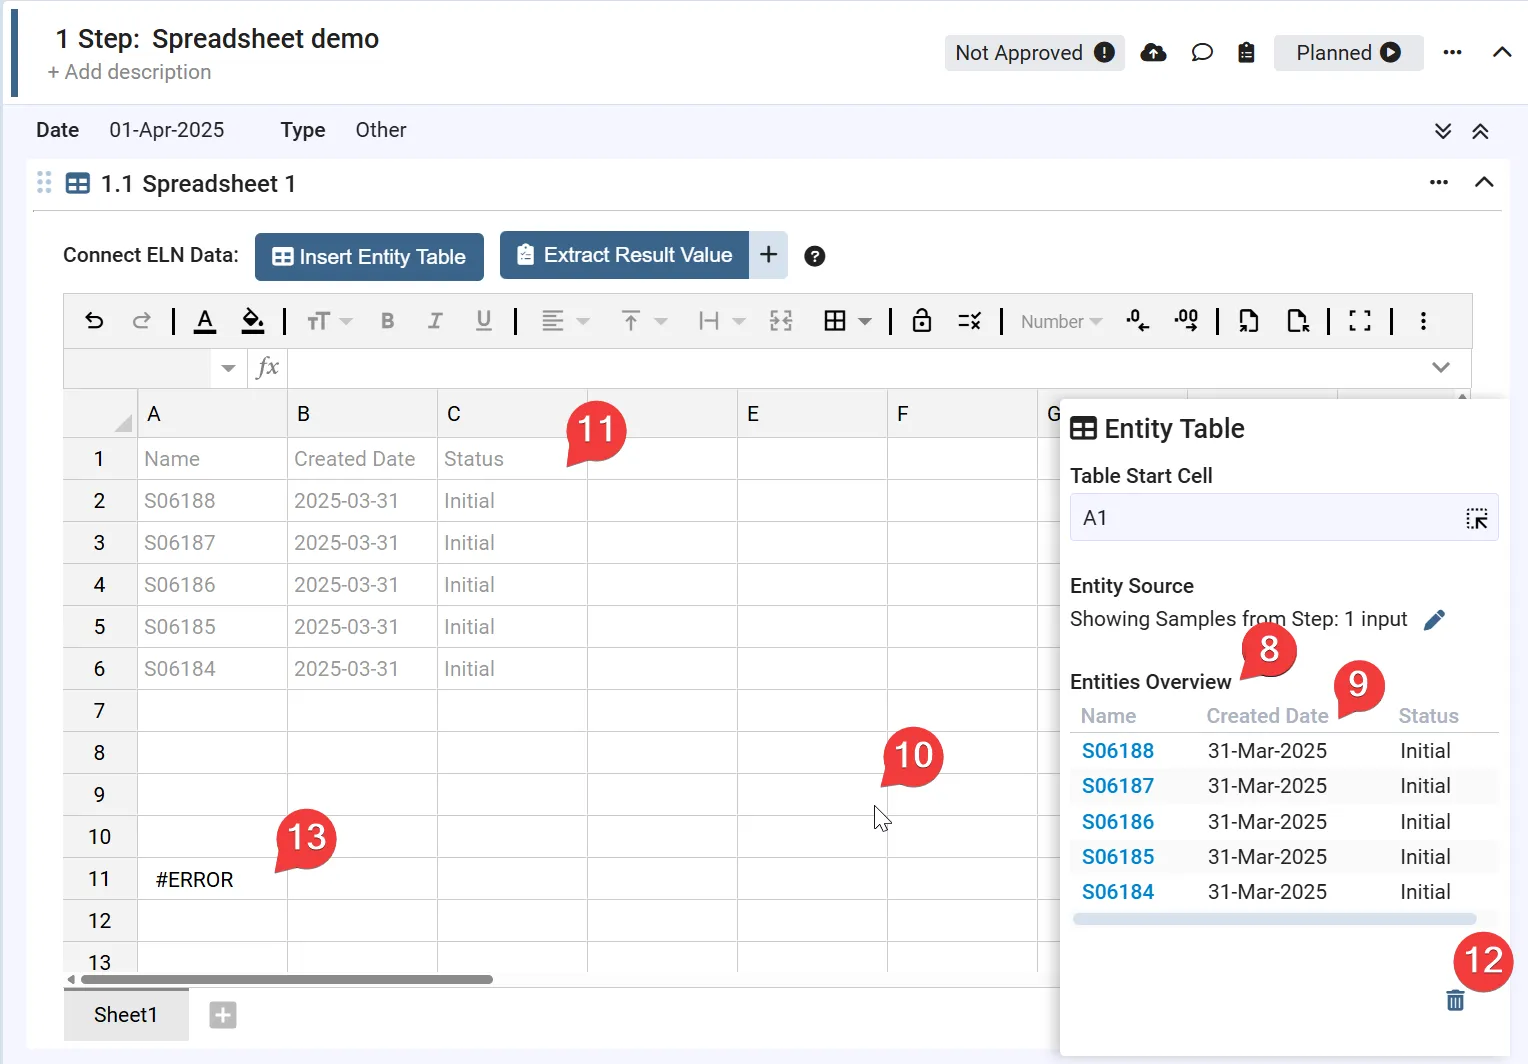
- Overview of found Entities - Here a list of all found entities are shown.
- Select columns to show in Spreadsheet - Select the columns from your entity that you wish to appear in the Spreadsheet.
- Closing Table Configuration - Clicking a cell that is not part of the entity table will close the slide in modal.
- Opening Table Configuration - Clicking a cell that is part of an entity table will open the slide in modal with all set configurations.
- Deleting Table Configuration - You can delete the inserted table by using the trashcan in the bottom right corner of the slide in modal.
- Error Handling - If there is not enough space for your table it will appear as “#ERROR”. Ensure the whole table can fit in the Spreadsheet, and won’t override other data.
Extracting Results from the Spreadsheet into the ELN
Section titled “Extracting Results from the Spreadsheet into the ELN”You can extract Result Values from the Spreadsheet that are saved as structured data in Scifeon.
To extract results you need to create a Save Results configuration. Here is how to -
- Create a Save Results configuration - Click the “Save Results” button in the Spreadsheet toolbar.
- Configure table - A slide in modal will appear in the right side of the Spreadsheet.
- Fill out relevant field - See the guide below on how to fill out configuration.
- See result values - When the configuration has all required information it will create Result Values that can be seen under the Spreadsheet section.
- Errors - If information can not be found in the table Result Values will not be created. Ensure all rows have required information for the configuration to read.
- Opening existing configurations - If you want to edit or delete an existing configuration, click the “Save Results” button for a list of existing configurations.
- Deleting a configuration - You can delete the configuration by using the trashcan in the bottom right corner of the slide in modal.
To extract results you make a configuration of what needs to be extracted. You will need to set the following information in the slide in modal -
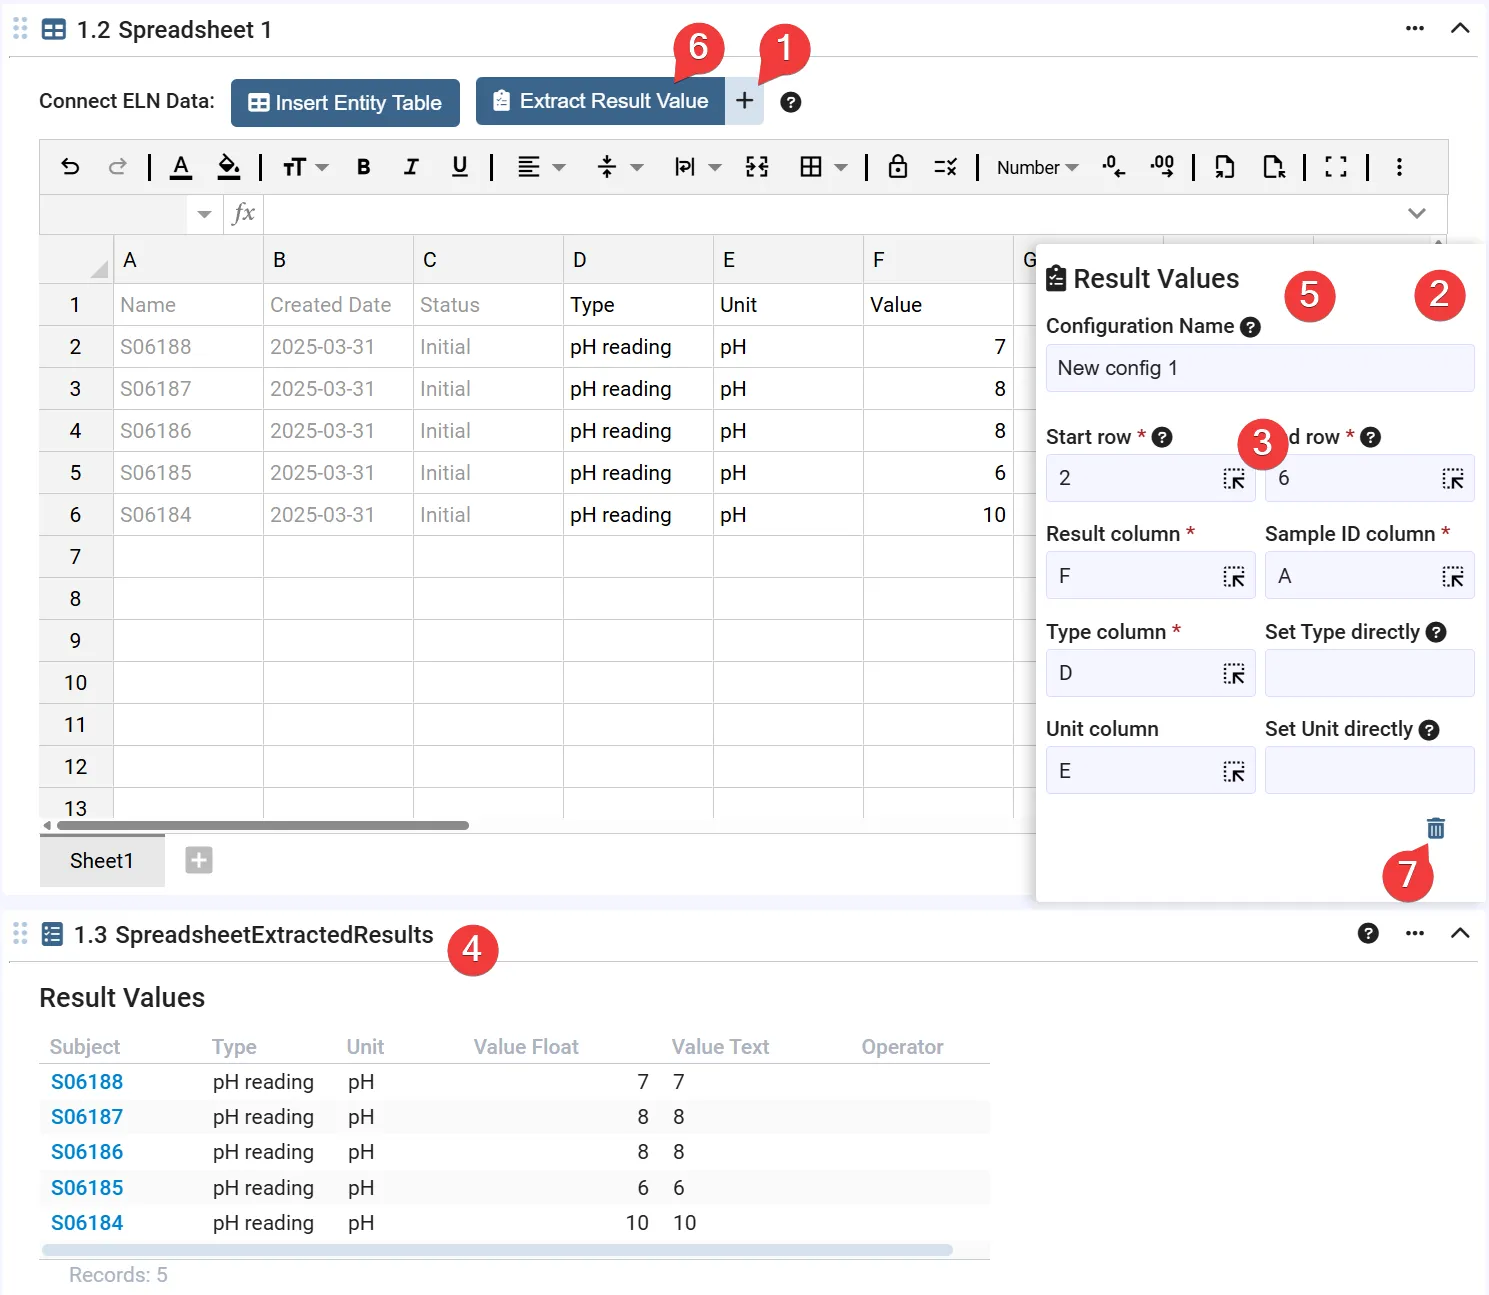
- Extraction configuration name - A name to discern this configuration should you have multiple Result Values to be extracted.
- Start and end row - The rows where extraction of results will be considered. (If end is not static, you can set it very high)
- Result column - The column in the Spreadsheet where the result value is.
- Sample ID column - The column in the Spreadsheet where the SampleIDs are. Each Result Value must be related to a SampleID.
- Type column - The column in the Spreadsheet where the type of the Result Value can be found. (Direct input available)
- Unit column (optional) - The column where the Result Values unit is. (Direct input available)

Macros
Section titled “Macros”Macros let you write JavaScript that reads and writes spreadsheet data in your ELN. They run in an isolated sandbox with a hard 10-second timeout, so an accidental infinite loop or a copy-pasted snippet that tries to call out to the internet will never freeze or compromise the app.
Managing macros
- Click the Macros button in the Spreadsheet toolbar.
- Click + Macro to create a new macro, give it a name and optionally a description.
- Write your JavaScript in the source editor. Two globals are available:
context(spreadsheet API) andmath(the mathjs library). - Click Run inside the dialog to test the macro immediately against the live spreadsheet.
- Toggle Active to surface the macro as a click-to-run button in a dedicated toolbar row below the formula bar — visible to anyone who opens the spreadsheet.
- Click Save to persist your changes.
See the Spreadsheet Macros reference for the full API, common patterns, and error catalogue.