
Import Templates
Scifeon offers an advanced feature to import data directly from Excel or CSV files into the system. This capability allows you to seamlessly integrate external data into your laboratory workflow. The import process is highly configurable, covering everything from general file settings and date formats to complex field mapping, import strategies and duplicate management.
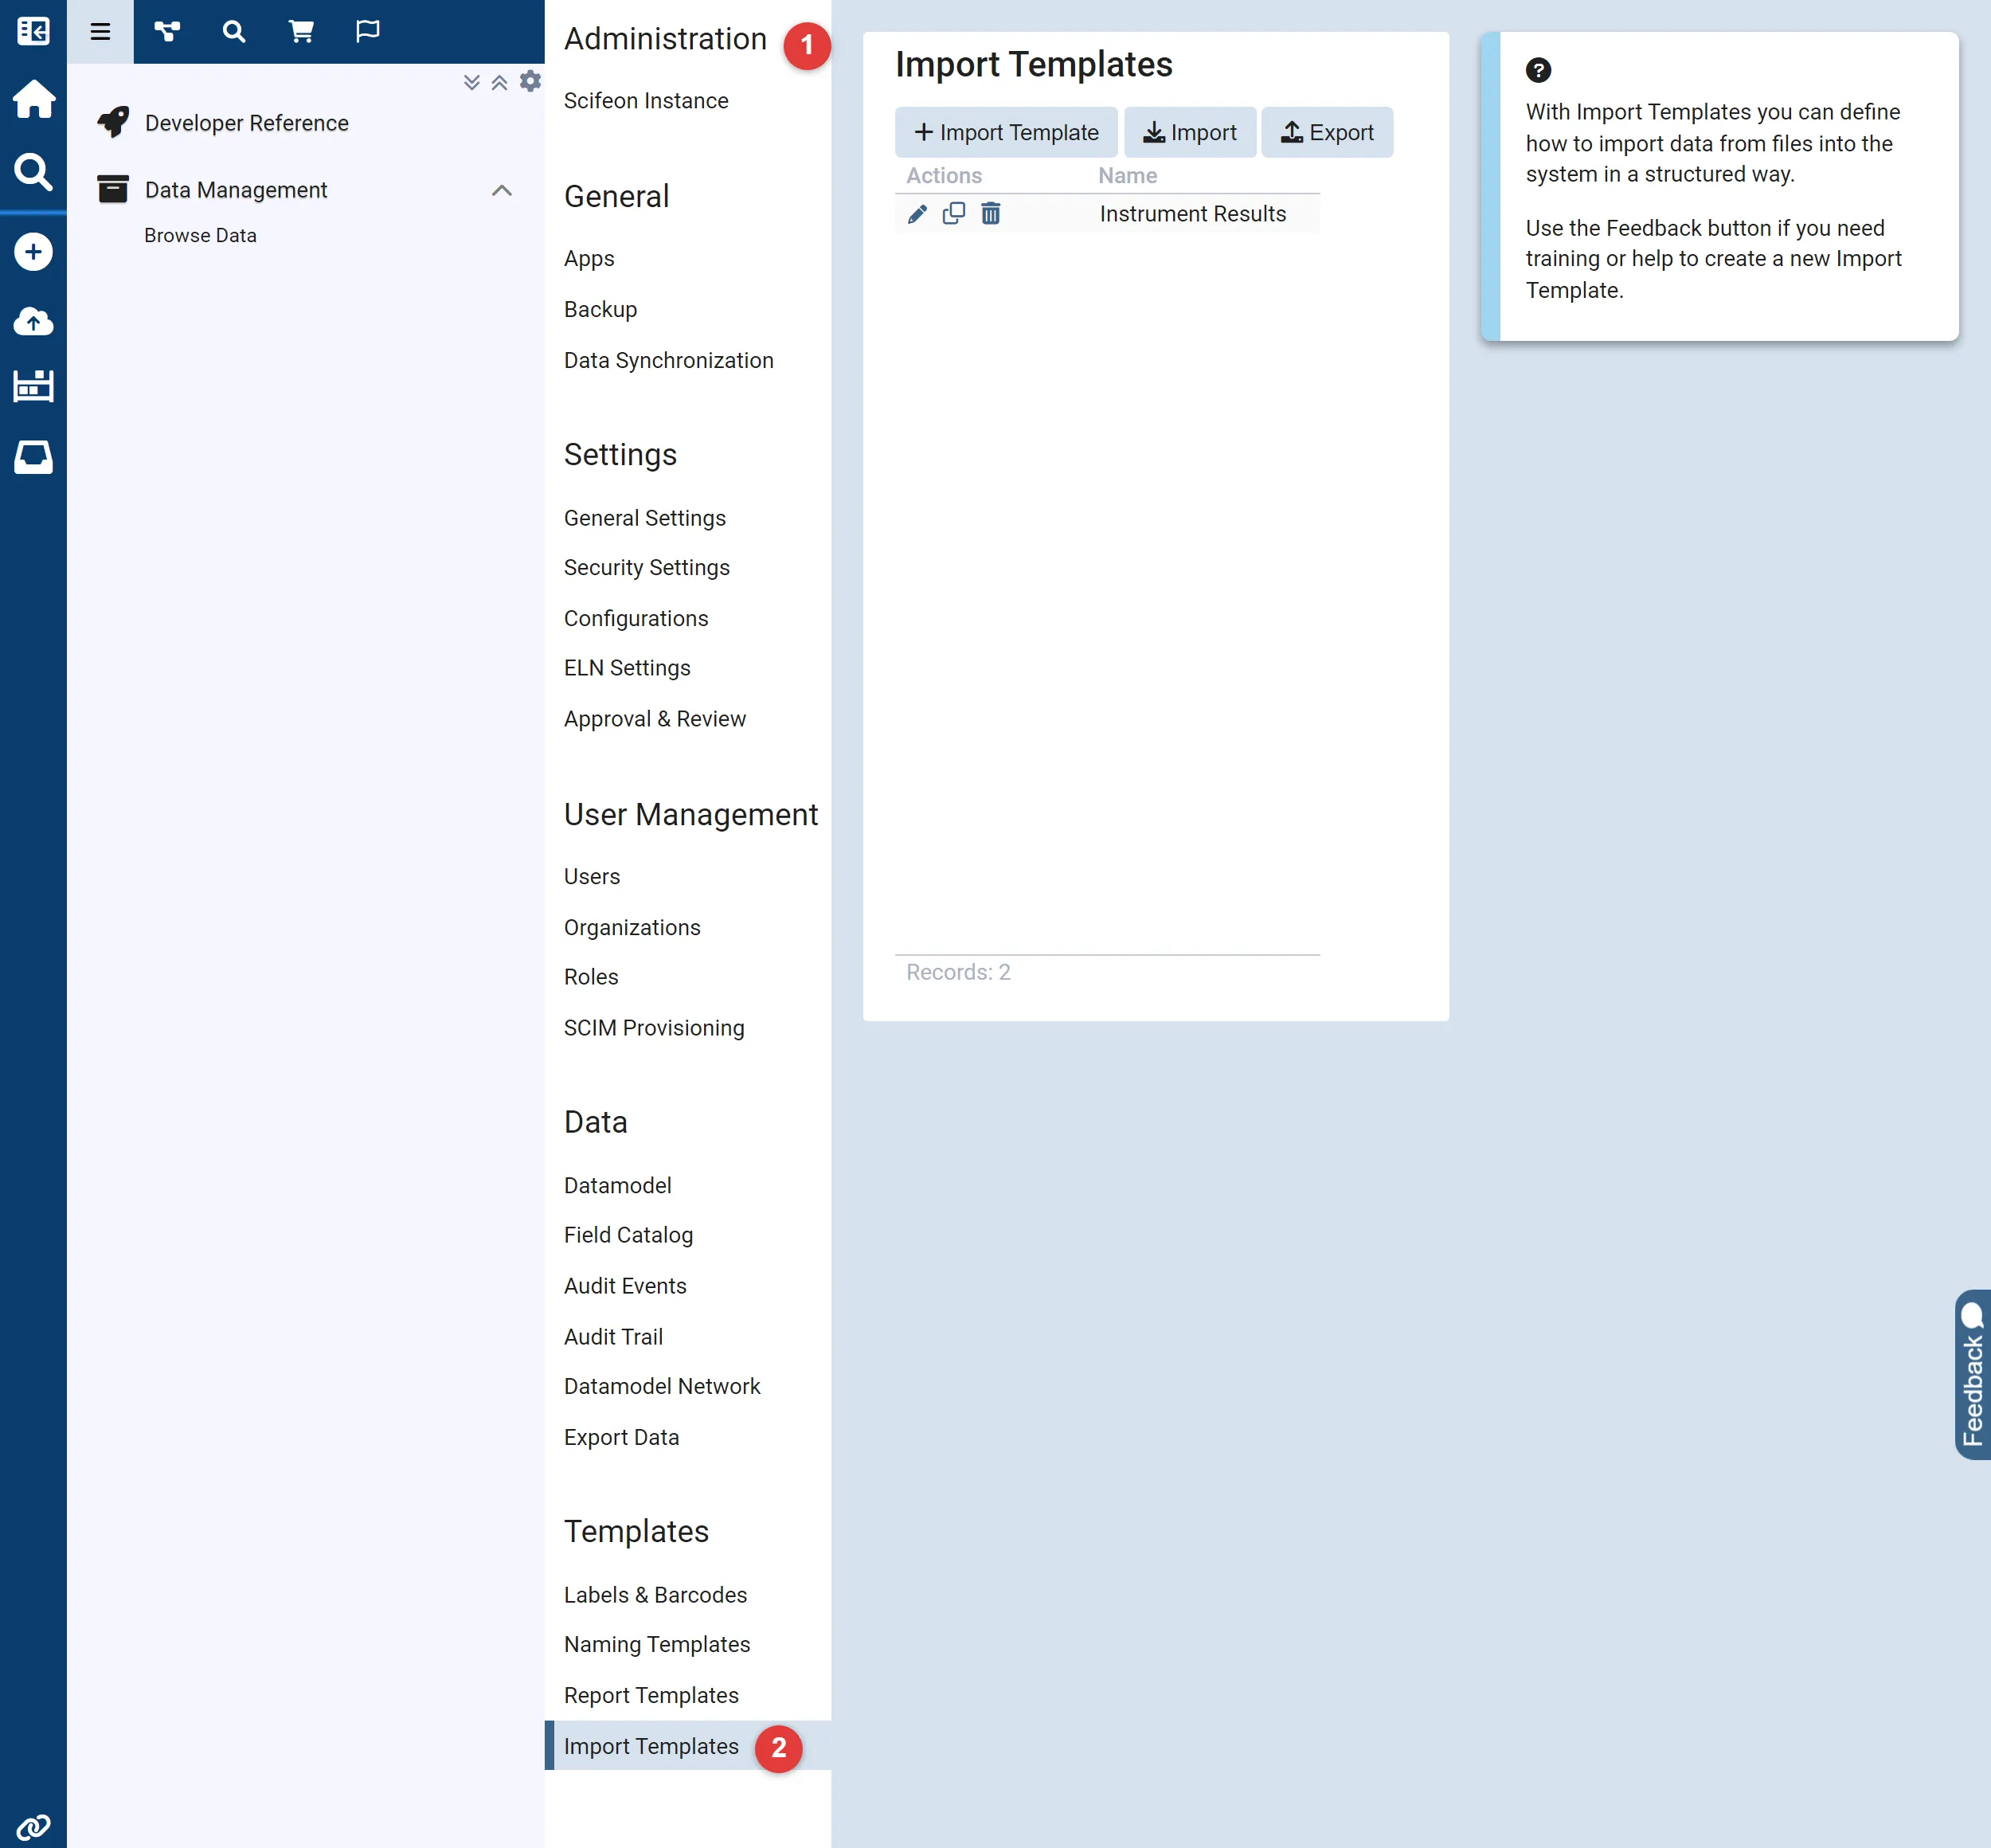
You find the Import Templates (2) under Templates in the Administration (1) section of Scifeon. You need to be Administrator or Data Manager, and to hold the Manage Import Templates permission, to access this feature.
An Import Template defines one or more Entity Tables, and each Entity Table generates one or more entities in the system. For each Entity Table you select the relevant Fields and describe where in the file their values come from. The Read Methods section describes the different ways of defining Entity Tables. The Field Mapping section describes how to map the data in the file to the Fields.
How a template is used
Section titled “How a template is used”Import Templates are not applied automatically on their own. When you upload a file — on the Upload Page or from a step in the ELN — Scifeon offers an Import Template data loader whenever a stored template matches every file you selected. If several templates match, you pick the one to use from a dropdown. Other data loaders may be offered for the same file, and some of them take precedence over Import Templates, so always check which loader is selected before saving.
General Configuration
Section titled “General Configuration”Before the data import begins, you must set up several general parameters:
- Name: A descriptive name for the template. This is the name shown in the template list and in the loader dropdown.
- File Type: Choose the file type for import: Excel or CSV.
- Date Formats: Define how dates are formatted in the file, using moment.js tokens such as
DD-MM-YYYY. New templates start withDD-MM-YYYY. One format applies to every date field in the template. Excel cells that are already true dates are read directly and ignore this setting. - Filename match criteria: Starts with, Contains and Ends with. A file must satisfy all the criteria you fill in, and at least one criterion is required — otherwise the template would match every file.
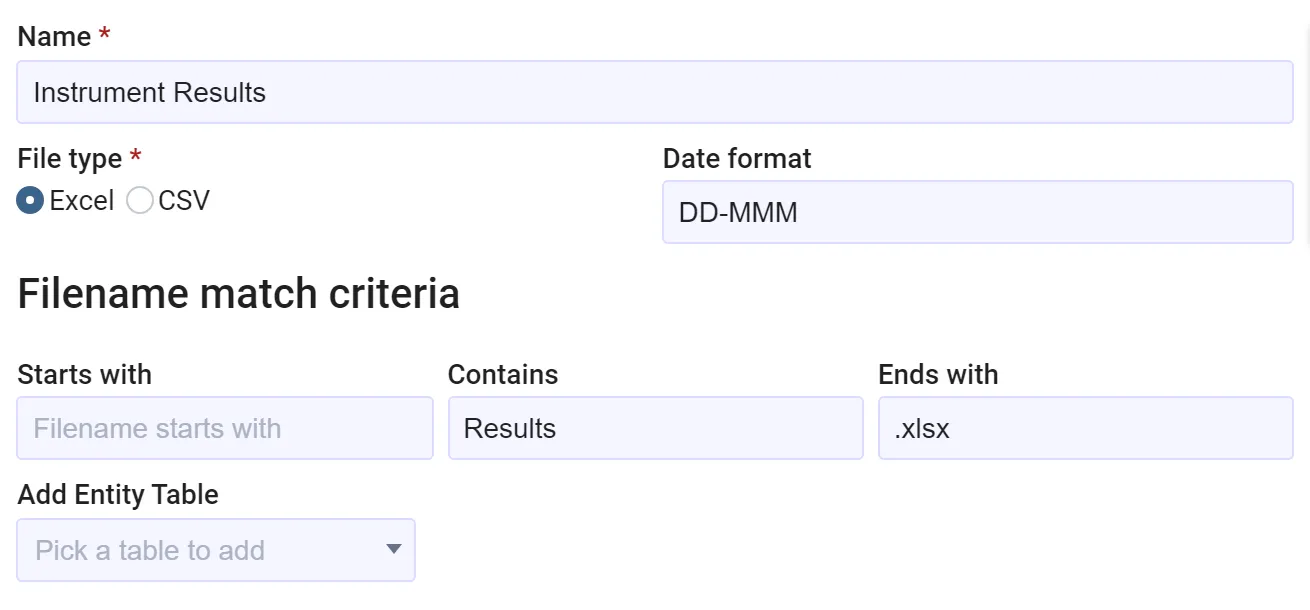
For Excel files, it is also necessary to select the correct sheet for each Entity Table by specifying its number. This is important because some files may have dynamic sheet names. In the case of CSV files, the content is automatically translated into a spreadsheet-like format, maintaining consistent positional references (e.g. cell C4 represents column 3, row 4).
Entity Tables
Section titled “Entity Tables”Pick a table in Add Entity Table to add it to the template. Each Entity Table has its own tab, and the following settings:
- Description: A name for the entities produced by this table, e.g. Samples or Measurements. It identifies the tab and is used in validation messages.
- Read method: By row, Matrix or Single entity — see below.
- Import Strategy: Create, Update, Upsert or Reference — see Duplicate Lookup and Import Strategy.
- Duplicate Lookup: The fields used to recognise entities that already exist.
- Sheet number: For Excel, the sheet this table reads from. It defaults to 1, and individual fields can override it.
- Start row / End row and, for Matrix, Start column / End column.
Fields are added with the + Field button, which lists the available fields grouped as in the data model and has a filter box. Fields that are required by the data model are added automatically and cannot be removed.
Tables may reference each other, and Scifeon works out the order in which to read them, so you do not have to add them in any particular sequence.
Read Methods
Section titled “Read Methods”Scifeon supports three different methods for generating entities from your file. Each method is designed to cater to different data layouts and user requirements.
1. By Row
Section titled “1. By Row”In the “By Row” method, each row in a specified range of the file corresponds to one new entity.
Configuration Details:
- Row Range: Specify the starting row and optionally the end row. The end row is included in the import.
- Excel Specific: The sheet number must be provided since sheet names might change dynamically.
- Field Mapping: Each field is mapped to a specific column within the row:
- Column: Specify the column for each field (e.g. column A for the sample name).
- Hardcoded Values: You can also assign fixed values to fields, which will be applied to all entities created from that row.
- Reference Other Entities: Link fields to data from previously defined entity tables (e.g. setting a subject ID for result values by referencing a sample record).
This method is straightforward and well suited for data that is organized in a single, continuous format.
Reading stops at the first row that produces no values at all, so you can leave the end row empty when the number of rows varies between files.
2. Matrix
Section titled “2. Matrix”The Matrix method is used to import data from a defined rectangular area in the spreadsheet. Each cell within the matrix area results in a new entity being created. This is particularly useful when values are organized in a grid, and additional context—such as labels, categories, or units—is located in header rows or columns outside the matrix itself.
Defining the Matrix Area
Section titled “Defining the Matrix Area”To configure a matrix import, you specify the rectangular area where the data is located:
- Start Column / End Column: Defines the horizontal range. Note that End column is not itself part of the matrix: reading stops when it is reached. Set it to the first column after your data, or leave it empty to read until the data runs out.
- Start Row / End Row: Defines the vertical range. The end row is part of the matrix, and can be omitted if the data continues to the bottom of the file.
- One Entity per Cell: Each cell in this area will produce a new entity.
Configuring Fields
Section titled “Configuring Fields”Each field in the entity table can be configured to pull its value from one of three sources:
- From the Cell Itself: This is typically used for the main value in the matrix. The system reads the value directly from the current cell. Here no column or row must be set.
- From a Header Row or Column: Some fields can be configured to pull from a different row or column—relative to the current cell position.
- For example, a field like
Typecan be set to read from row 1, andUnitfrom row 2. When processing the cell atC3, the system will look atC1for theTypeandC2for theUnit.
- For example, a field like
- Hardcoded Value: You can also define a fixed value for any field, which is applied to all entities.
- Reference Other Entities: Link fields to data from previously defined entity tables (e.g. setting a subject ID for result values by referencing a sample record).
Example Setup
Section titled “Example Setup”Consider this example:
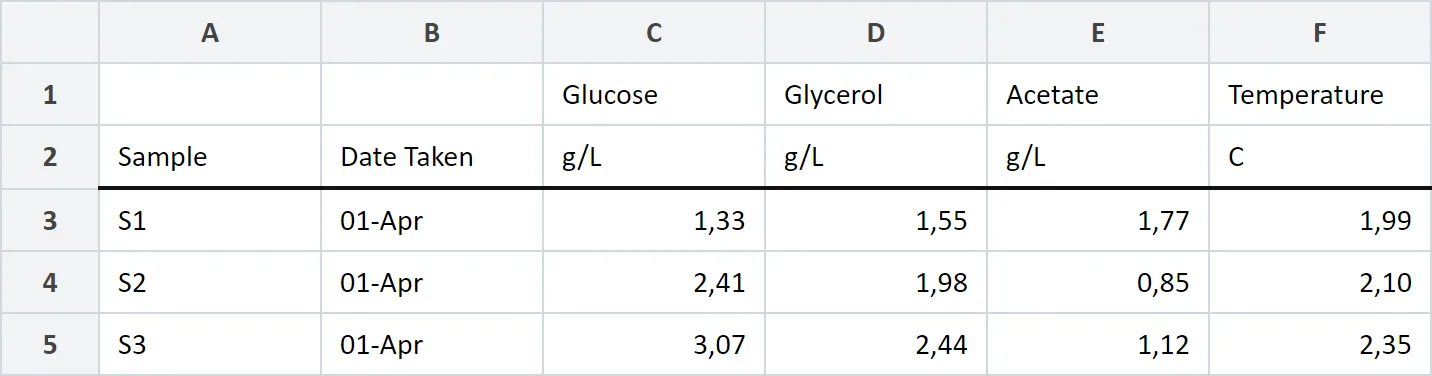
A common use case might involve:
- A matrix of data values in cells
C3:F5. - Row 1 containing labels (used as a
Typefield). - Row 2 containing units (used as a
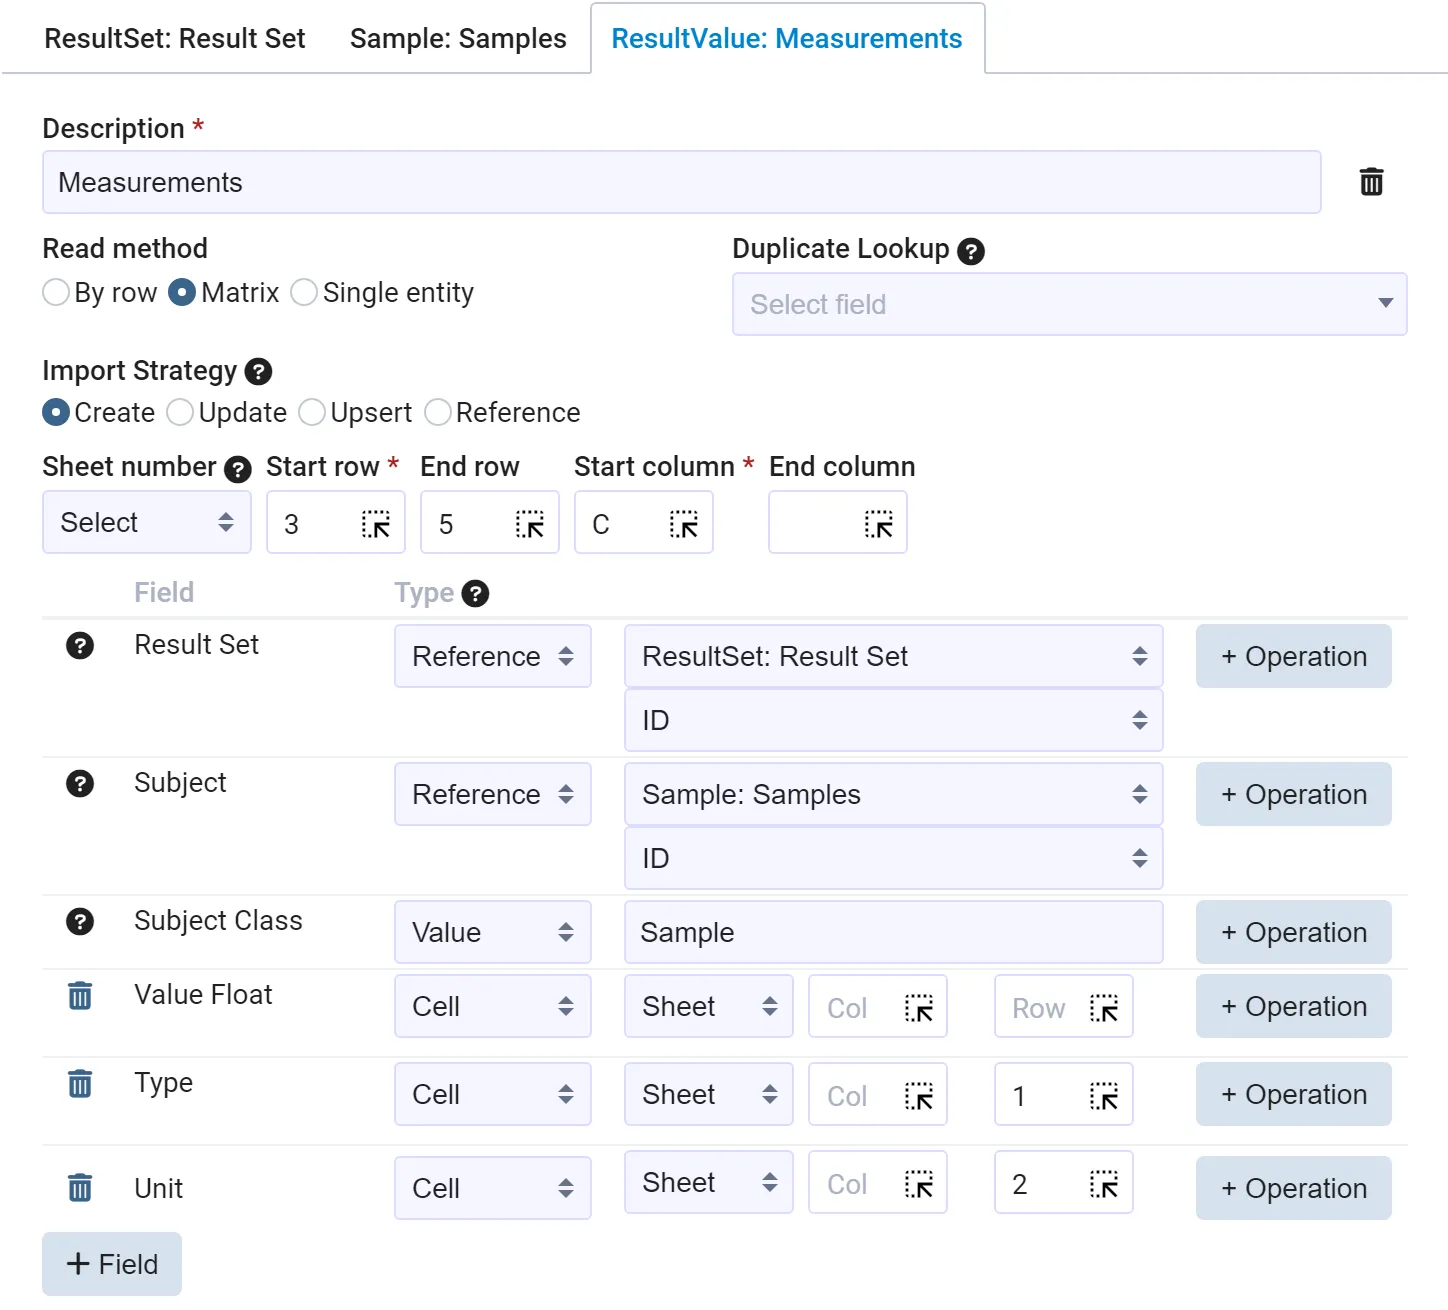
Unitfield). - Each field is configured like this:
- Value Float: from the matrix cell itself (e.g.
C3), so neither column nor row is set - Type: from the same column, but row 1 (e.g.
C1) - Unit: from the same column, but row 2 (e.g.
C2) - Subject and Result Set: references to the Sample and Result Set tables in the same template
- Subject Class: the fixed value
Sample
- Value Float: from the matrix cell itself (e.g.
As the importer iterates through the matrix, it reads each value along with its corresponding context, resulting in well-structured and fully linked data entries. The following example illustrates this setup:
3. Single Entity
Section titled “3. Single Entity”The “Single Entity” method allows for static field assignment by directly specifying cell positions or fixed values.
Configuration Details:
- Direct Cell Mapping: Map fields by pointing to specific cells.
- Hardcoded Values: Alternatively, assign a constant value to a field.
- Reference Other Entities: Link fields to data from previously defined entity tables.
This method is useful when key information is always located in the same spot on the spreadsheet, or when certain fields require consistent, predetermined values — for example a single Result Set that all imported results belong to.
Field Mapping
Section titled “Field Mapping”Mapping data fields from the Scifeon data model to specific positions in your file is a crucial step. Every field row has a Type that decides where its value comes from:
- Cell: Use the value from the corresponding cell in the spreadsheet. Set Col and Row to pin the field to a fixed position; leave one of them empty to follow the row or column currently being read. For Excel you can also set a Sheet per field, which overrides the sheet set on the entity table.
- Value: Use a static value for this field. The editor matches the field type, so dates, enumerations and linked entities are picked rather than typed.
- Reference: Use the value of a field on another entity table in the same template, typically its ID. This is how you link results to the samples created from the same file.
Instead of typing column letters and row numbers, you can click the picker next to each box and select the position directly in the file preview.
Referencing the uploaded file
Section titled “Referencing the uploaded file”The table list under Reference always offers File: Uploaded File, which lets you write the name or ID of the uploaded file into a field. Entity tables that use the Matrix read method cannot be referenced.
Automatic lookup of linked entities
Section titled “Automatic lookup of linked entities”When a field links to another entity — a project, a sample type, a result set — you do not have to put IDs in the file. Scifeon looks the text up, first by ID, then by name, then by description, ignoring upper and lower case. If none of those match, it falls back to a “contains” search and warns you which entity it picked. If nothing matches at all, you get a warning naming the field and the value it could not resolve.
Some fields are narrowed by a parent field. In that case the lookup only considers entities that belong to the parent value resolved for the same row, so the same name can be used under different parents.
Value Operations
Section titled “Value Operations”A range of built-in value operations is available to transform and clean up data before it is sent to the database. Add them with the + Operation button on a field. Operations run in the order they are listed, each one working on the result of the previous, and surrounding whitespace is always removed.
| Operation | What it does | Settings |
|---|---|---|
| Text before | Keeps the text before the first delimiter. | Delimiter |
| Text after | Keeps the text after the first delimiter. | Delimiter |
| Text between | Keeps the text between the two delimiters. | Start delimiter, End delimiter |
| Text replace | Replaces every match of a pattern. The pattern is a regular expression and ignores case. | Pattern, Value |
| Text replace exact | Maps whole values to other values, e.g. pos to Positive. Only an exact match, ignoring case, is replaced. | A list of Pattern / Value pairs |
| Text extract | Keeps only the listed characters that occur in the value. If the value is abcde and the characters are aez, the result is ae. | Characters |
| Text includes | If the value contains the pattern, the entire value is replaced. | Pattern, Replace with |
| Text empty | Supplies a value when the cell is empty or contains only whitespace. | Value |
| Text append | Adds text to the end of the value. | Value |
| Text prepend | Adds text to the start of the value. | Value |
| Text append column | Adds the cell from another column, on the same row, to the end of the value. Nothing is added when that cell is empty. | Column, Separator |
| Text prepend column | Adds the cell from another column, on the same row, to the start of the value. | Column, Separator |
These operations help prepare your data in the expected format and ensure consistency throughout the import.
Example: extract result operator
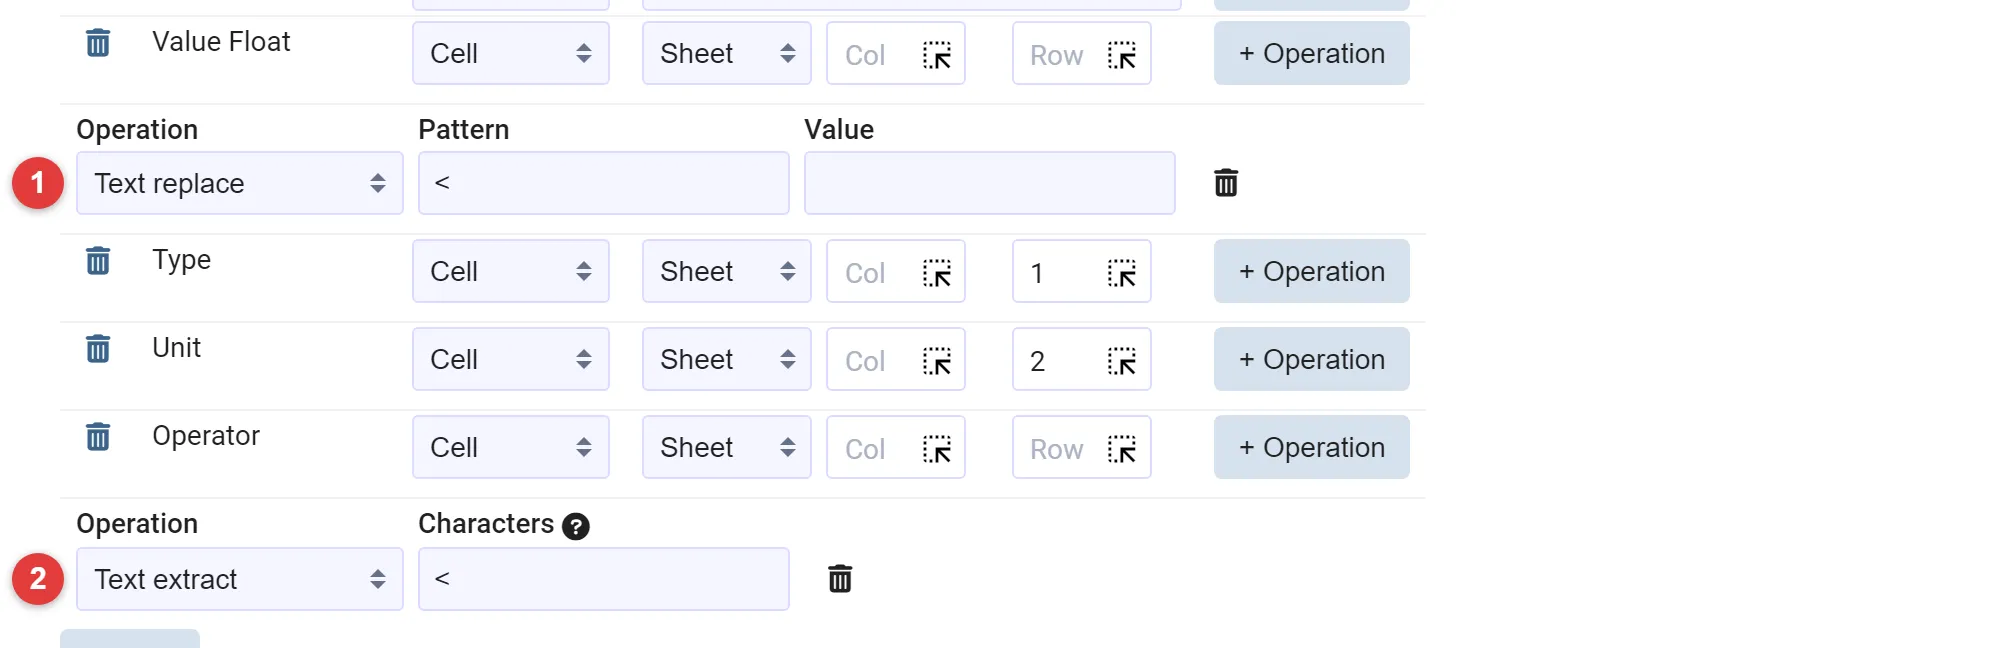
Section titled “Example: extract result operator”In the following case, the cells include < when the value cannot be measured exactly. The operation Text replace (1) is used to remove the < and keep only the numeric value. For the Operator field, Text extract (2) is used to capture the < if it is there, and everything else is removed.
Numbers and dates
Section titled “Numbers and dates”Numbers may use either a comma or a full stop as the decimal separator. A cell that cannot be read as a number, such as a dash, leaves the field empty instead of failing the import. Dates are read with the date format set on the template.
Duplicate Lookup and Import Strategy
Section titled “Duplicate Lookup and Import Strategy”To prevent multiple entries of the same entity, Scifeon provides a duplicate lookup. Duplicate Lookup is a list of fields — for example the sample name, or the collection date together with the location — that together identify one entity.
The lookup works in two directions:
- Against the database. If an entity with the same values already exists, the imported row is attached to it instead of creating a new record. The row is then shown as an update, or as unchanged when none of the mapped fields differ.
- Within the file. Rows in the same file that share the same key values are collapsed into a single entity, and everything that refers to them points at that one record.
Import Strategy decides what may happen to the entities of a table:
- Create: Only creates new entities. If an entity already exists, it is skipped with a warning.
- Update: Only updates existing entities. If an entity does not exist, it is skipped with a warning.
- Upsert: Creates new entities and updates existing ones.
- Reference: Only looks up existing entities so that other entities can refer to them. Produces an error if the entity is not found.
Update and Reference rely entirely on the duplicate lookup, so at least one lookup field must be selected for them.
Testing a template
Section titled “Testing a template”You do not have to upload a real file to find out whether a template works. In the template editor, choose Select file under Preview with file, then click Apply Template to File. The file is shown next to the configuration, and Generated Entities lists what the template would produce, with one tab per entity table.
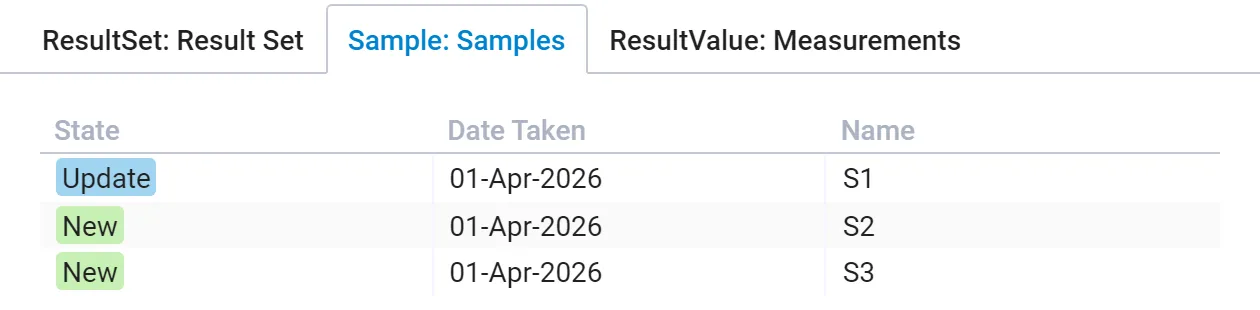
Each row carries a state:
| State | Meaning |
|---|---|
| New | A new entity will be created. |
| Update | An existing entity was found and will be updated. |
| No Update | An existing entity was found, but nothing has changed. |
| Reference | An existing entity was found and will only be referenced. |
| Duplicate | Another row in the same file already covers this entity. |
| Error | Something is wrong and the row cannot be imported. |
In the example above the sample S1 already exists, so it is matched by the duplicate lookup and shown as an update, while S2 and S3 are created.
Warnings and errors are listed per entity table, both here and on the upload page. A file cannot be saved while any entity is in error.
Managing templates
Section titled “Managing templates”The template list offers three actions per template: Edit, Clone and Delete. Templates that are delivered as part of a configuration are read-only — they can be cloned, but not edited or deleted.
Export adds the templates to an update set so they can be moved to another Scifeon system, and Import takes you to the upload page where the templates are put to use.
CSV File Import Considerations
Section titled “CSV File Import Considerations”CSV files are seamlessly integrated into the system by treating them as a spreadsheet. The positional references in CSV files align with those used in Excel files. For instance, cell references such as C4 continue to represent column 3, row 4 in both file types.
The separator is detected automatically, and files are read as UTF-8 with a fallback for Western European encodings, so there is nothing to configure. Only files with the .csv extension are treated as CSV.
Example Workflow
Section titled “Example Workflow”Imagine a typical import scenario involving sample data and related result values:
-
General Setup: Begin by configuring essential parameters such as the name, file type, date format and filename match criteria.
-
Defining Entity Tables:
- The Result Set table is set up using the “Single Entity” method, giving all imported results a common owner.
- The Sample table is set up using the “By Row” method, extracting the sample name and the date taken from designated columns. Its duplicate lookup is the sample name, and its import strategy is Upsert, so samples that already exist are reused.
- The Result Value table is configured using the “Matrix” method. This table reads data from a block of cells where the first row specifies the type of measurement, the second row provides the measurement units, and the remaining rows contain the measured values for each sample. Its Subject and Result Set fields are references to the two tables above.
-
Field Mapping and Transformation: Use the field mapping tool to connect spreadsheet cells to the corresponding fields in the Scifeon data model. If a single cell contains combined data, apply the Text before and Text after operations to separate the values.
-
Previewing: Select a real file and apply the template. Check the generated entities for each table, and resolve any warnings or errors before saving the template.
-
Importing: Upload the file on the upload page or from a step in the ELN, make sure the Import Template loader and the right template are selected, review the entities once more and save.
When you import from a step in the ELN, new samples and result sets are linked to that step automatically, and the uploaded file records which template was used.