
AI Assistants (MCP)
Scifeon has a built-in MCP server. MCP (Model Context Protocol) is the standard that AI assistants use to reach external systems, so once you connect an assistant to Scifeon you can ask it questions about your samples, experiments, results and inventory in plain language, and it looks the answers up in Scifeon as you talk.
The assistant can only read. Every tool the MCP server offers is a lookup or a search - nothing an assistant does can change, create or delete data in Scifeon.
This page covers Microsoft Copilot, Claude Code, Visual Studio Code and Claude Desktop / claude.ai, but any client that speaks MCP over HTTP can connect.
Example questions
Section titled “Example questions”- “Which experiment produced sample S-00123?”
- “Show me the results registered for batch B-0042.”
- “Where is tube T-0099 stored?”
- “Find compounds tagged ‘stability-study’ that were made this year.”
- “Which experiments used plate P-0007 as input, and what came out of them?”
Answers include a link to each record, so you can click straight from the assistant into Scifeon to see the data in context.
Connection details
Section titled “Connection details”| Server URL | https://your-domain.scifeon.cloud/mcp |
| Transport | Streamable HTTP |
| Authentication | OAuth 2.0 with dynamic discovery - you sign in with your Scifeon account |
Note: The server does not support the older SSE transport, and it cannot be run as a local (stdio) command. If a client asks you to choose a transport, choose HTTP.
Signing in
Section titled “Signing in”An assistant connects by signing you in through your browser. Scifeon publishes its own sign-in details and the client registers itself, so there is nothing to copy back and forth: you sign in to Scifeon as usual, Scifeon asks whether to allow the access, and the client receives an access key of its own.
That key is valid for 30 days and named after the application (for example MCP: Claude Code). It
only works for assistant lookups - it cannot be used to sign in to Scifeon or to call the rest of the
API - and you can see and delete it at any time under the security settings in your user profile at
https://your-domain.scifeon.cloud/#/user/profile. When it expires, connect again.
Security and permissions
Section titled “Security and permissions”- The assistant sees what you see. Requests run as the account that signed in, with the same roles, departments and projects that apply when you are signed in to Scifeon yourself.
- The key from signing in only works for assistants. It is limited to assistant lookups: it cannot be used to sign in to Scifeon or to call the rest of the API, and you can delete it at any time in your user profile.
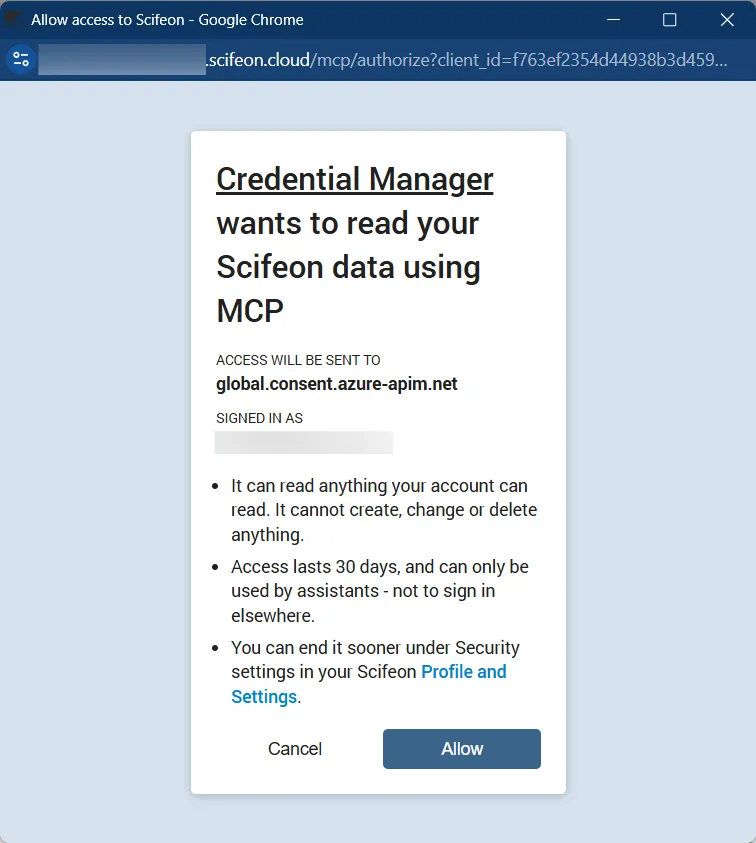
- Nothing is granted without asking you. Signing in from an assistant ends with a screen naming the application, the address the access will be sent to, and the account granting it. If you did not start the connection yourself, click Cancel.
- Result lookups need the Lab app. On instances without the Lab app bundle, the result tools return nothing.
- IP restrictions apply. If your instance limits access to a list of IP addresses, a cloud-hosted assistant such as Microsoft Copilot connects from its vendor’s addresses, which have to be allowed first. Contact support@scifeon.com.
Available tools
Section titled “Available tools”The assistant picks the tools it needs on its own; you never call them by name. The list is useful for knowing what you can ask about.
| Tool | What it does |
|---|---|
get_entity_classes | Lists the data available: entity classes, views, their category and description. |
get_columns_for_e_class | Lists the fields of a class or view, including custom fields, with types and links to related classes. |
get_possible_values | Suggests the values a field actually holds, for example the existing types or statuses. |
get_entity | Reads one record by class and ID. |
get_entities | Lists records of a class with a filter, sorting and a field selection. |
search_entities | Keyword search by name or text, within a class or across everything indexed. |
search_by_tag | Finds the records carrying a given tag. |
get_experiment_for_entity | The experiment that produced a record, for example the experiment that made a sample. |
get_experiment_used_in | The experiments that consumed a record as a step input. |
get_steps_for_experiment | The steps of an experiment in order, with procedure, type and status. |
get_experiment_dependencies | The experiments upstream and downstream of an experiment, for tracing a process. |
get_results_for_entity | The results registered for a record, matching the Results panel in Scifeon. |
get_results | Searches results across the instance by type, unit or numeric value. |
get_experiments_for_results | The experiments that produced a given set of results. |
get_form_entries_for_entity | The process parameters and data-entry fields captured on a record in step forms. |
search_by_sequence | Finds compounds, chains, plasmids, oligos and fragments containing a protein or DNA (sub)sequence. |
get_inventory_location | Where a stored item is: its position and the storage path up to the storage system. |
Microsoft Copilot
Section titled “Microsoft Copilot”Microsoft Copilot reaches Scifeon through an agent you build in Copilot Studio. You add the Scifeon MCP server as a tool on that agent, try it out in Copilot Studio, and then publish the agent so your colleagues can use it in Microsoft 365 Copilot and Teams.
The steps below follow Microsoft’s MCP onboarding wizard. Microsoft’s own walkthrough is Connect your agent to an existing MCP server, which also covers building a custom connector in Power Apps if the wizard is not available in your environment.
Prerequisites
Section titled “Prerequisites”- A Copilot Studio licence or trial, and permission to create agents in your environment.
- An agent in Copilot Studio’s current agent experience - the agent page with Build, Preview, Evaluate and Monitor tabs across the top. This is what Copilot Studio creates by default.
- A Scifeon account. Everyone who uses the agent signs in with their own.
Note: On Copilot Studio’s older, classic agent experience the same Add MCP server wizard is reached from the agent’s Tools page, testing happens in the Test pane, and publishing on the Channels page - Microsoft’s walkthrough above covers that experience.
Note: If your Scifeon instance restricts access by IP address, ask support@scifeon.com to allow Microsoft’s addresses before you start - otherwise the connection fails with no useful error.
Step 1: Add the Scifeon MCP server as a tool
Section titled “Step 1: Add the Scifeon MCP server as a tool”- Open your agent in Copilot Studio, on the Build tab.
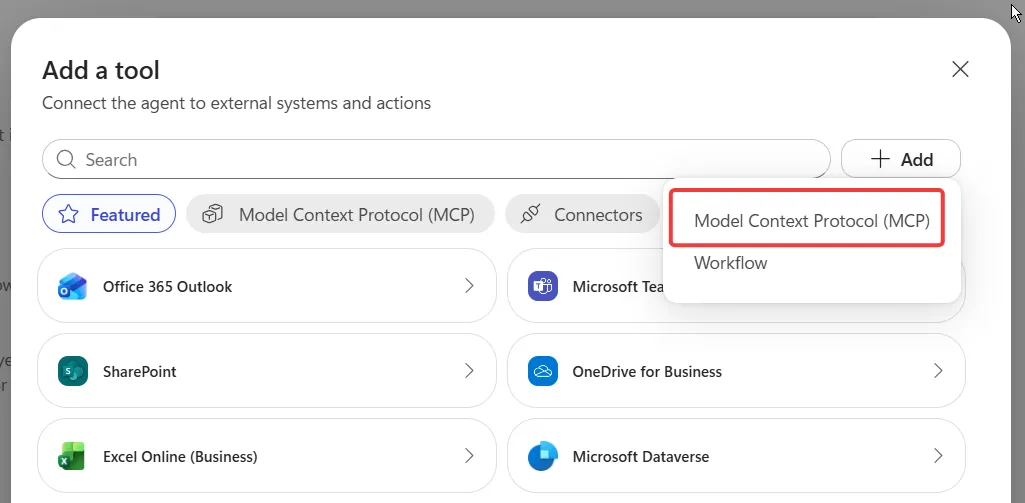
- In the panel on the right, click + next to Tools. The Add a tool dialog opens.
- Click + Add in the top right corner, then choose Model Context Protocol (MCP).
Step 2: Describe the server and choose how it signs in
Section titled “Step 2: Describe the server and choose how it signs in”Fill in the Add MCP server form:
- Server name:
Scifeon - Server description:
Read-only access to scientific data in Scifeon: samples, batches, compounds, experiments, results, step forms and inventory locations. - Server URL:
https://your-domain.scifeon.cloud/mcp - Authentication: OAuth 2.0
- Configuration type: Dynamic (with discovery)
Click Add.
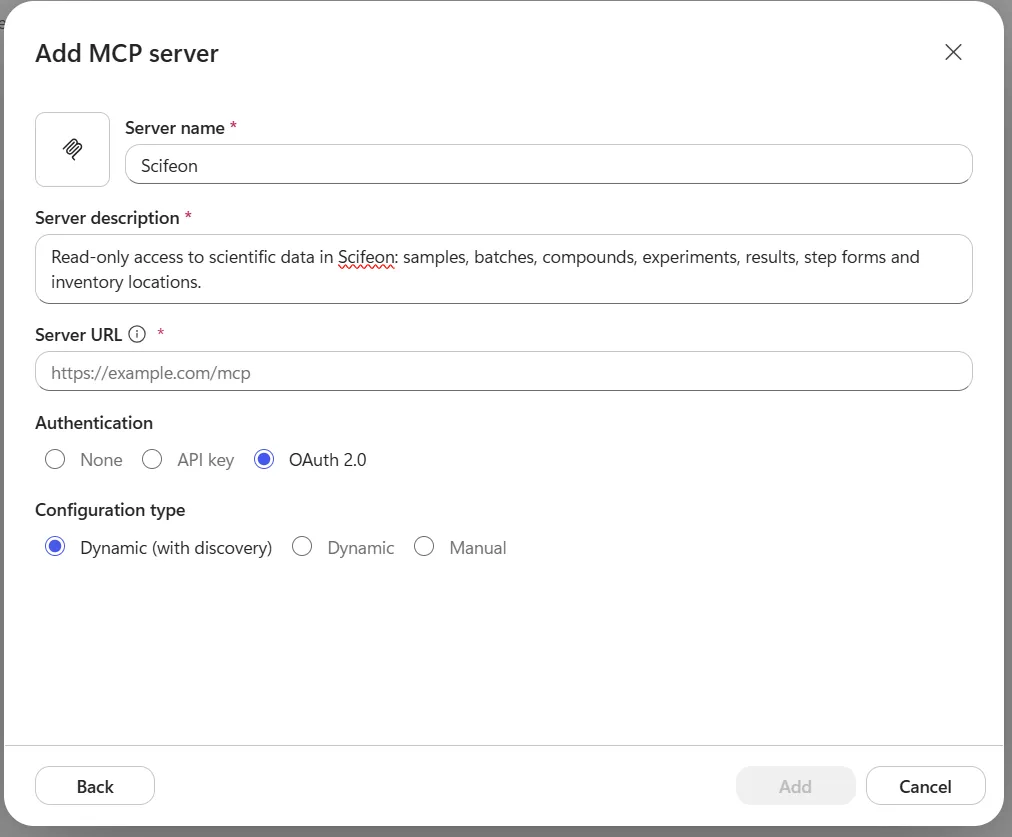
Dynamic discovery means there is nothing to copy back and forth: Scifeon publishes its own sign-in details and Copilot Studio registers itself. Everyone who talks to the agent signs in with their own Scifeon account and sees exactly what that account may see - no shared key, and nothing to rotate.
The server description is not decoration: Copilot reads it to decide when a question is one for Scifeon. Keep it accurate, and mention the kinds of data your instance holds.
Note: Signing in from Copilot needs a Scifeon version that accepts Microsoft’s sign-in address. If the browser shows an
invalid_requesterror instead of the Scifeon sign-in page, your instance is older than that - contact support@scifeon.com.
Note: Microsoft changes this dialog from time to time, and their own documentation currently describes an earlier version of it. In that version Configuration type is called Type with the option named Dynamic discovery, you click Create rather than Add, then Next, and finish by choosing Create a new connection and Add to agent in an Add tool dialog.
Step 3: Sign in to Scifeon
Section titled “Step 3: Sign in to Scifeon”Copilot Studio now shows Select a connection, with the Scifeon server listed as Not connected - the server is registered, but no connection exists yet.
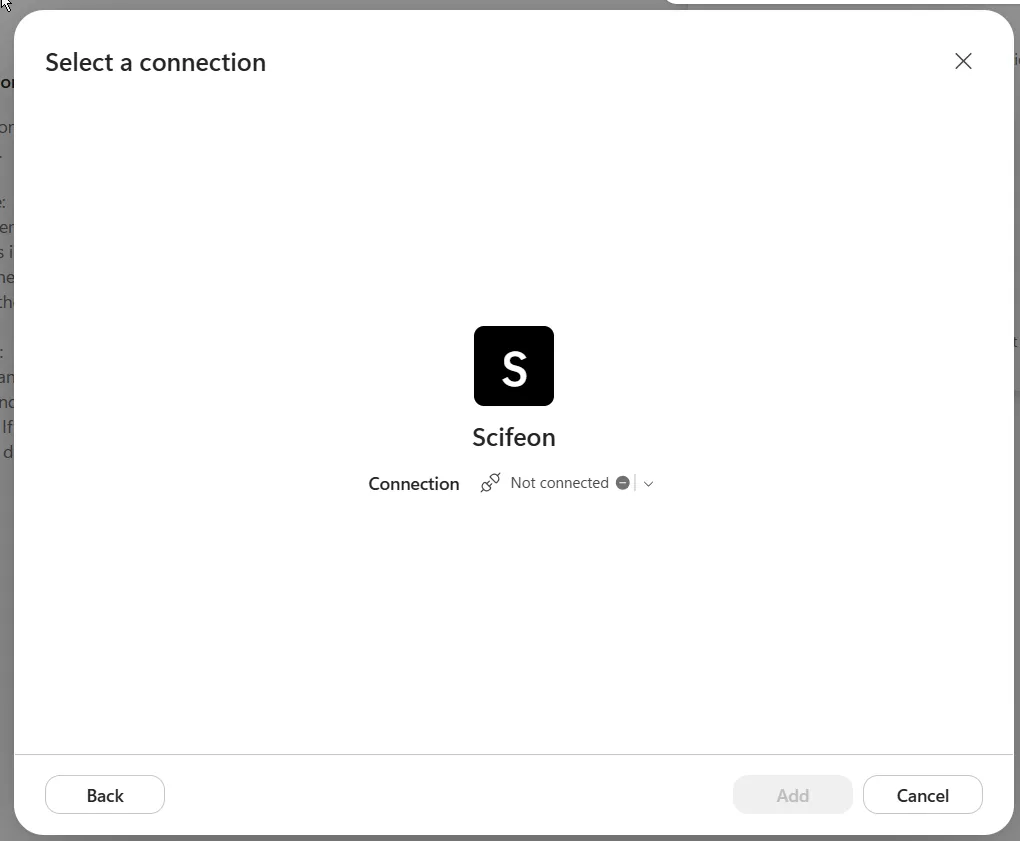
- Click the arrow next to Not connected and create the connection.
- A browser window opens on your Scifeon sign-in page. Sign in.
- Scifeon then asks whether to allow the access. The screen names the application that is asking,
the address the access will be sent to, and the account granting it. For Copilot the application
is Credential Manager - the Microsoft service that holds connections on the agent’s behalf -
and the address is a
consent.azure-apim.netaddress. Check the address is what you expect, then click Allow. - Wait until the connection shows as connected. Add stays greyed out until it does.
- Click Add to put the tool on your agent.
Signing in leaves a 30-day access key in your Scifeon profile, limited to assistant lookups - see Signing in.
Step 4: Try the agent
Section titled “Step 4: Try the agent”- Open the Preview tab.
- Ask something that needs Scifeon, for example “Which experiment produced sample S-00123?”.
- If the first call shows a consent card for the connection, click Allow or Connect.
- Check that the answer contains links back to Scifeon, and click one to confirm it opens the right record. The activity trace alongside the chat shows which Scifeon tools the agent called.
Step 5: Publish to Microsoft 365 Copilot and Teams
Section titled “Step 5: Publish to Microsoft 365 Copilot and Teams”- On the Build tab, click the chevron next to Publish in the top right corner.
- In the Publish agent dialog, select the Microsoft 365 Copilot and Microsoft Teams channels, click Publish and wait for it to finish. The status in the top right corner changes to Published.
- To let colleagues use it, click the Share icon next to Publish and share the agent with individual people or security groups - or with everyone, by setting End user access under Organization.
- Depending on your tenant’s settings, a Microsoft 365 administrator has to approve the agent before colleagues can find it.
Usage of agents on this experience is billed through Copilot Credits, and the people you share with may need a Copilot Studio licence of their own - see Microsoft’s licensing documentation for what applies in your tenant.
Step 6: Use it in Microsoft 365 Copilot
Section titled “Step 6: Use it in Microsoft 365 Copilot”Once published, the agent appears in the Microsoft 365 Copilot app and in Teams. Open it from the agent list and ask your question as you would in Copilot Studio.
The first time a colleague asks the agent something that needs Scifeon, Copilot asks them to sign in. Each person therefore sees exactly the data their own Scifeon account may see, and nothing else.
Note: Developers can also register an MCP server directly on a declarative agent with the Microsoft 365 Agents Toolkit. See Build MCP plugins for declarative agents.
Claude Code
Section titled “Claude Code”Add the server in one command:
claude mcp add --transport http scifeon https://your-domain.scifeon.cloud/mcpThe same server as an entry in .mcp.json:
{ "mcpServers": { "scifeon": { "type": "http", "url": "https://your-domain.scifeon.cloud/mcp" } }}Then run /mcp and choose to authenticate. Your browser opens, you sign in to Scifeon as usual, and
Scifeon asks whether to allow the access before handing the client a 30-day key of its own - see
Signing in.
Visual Studio Code
Section titled “Visual Studio Code”In agent mode, GitHub Copilot in VS Code can use the Scifeon tools. Add the server to
.vscode/mcp.json:
{ "servers": { "scifeon": { "type": "http", "url": "https://your-domain.scifeon.cloud/mcp" } }}Start the server from the file. VS Code asks to allow authentication, opens your browser on the Scifeon sign-in page, and Scifeon asks whether to allow the access - see Signing in. The Scifeon tools then appear in the tool picker in Copilot Chat.
Note: VS Code calls the top-level key
servers, while Claude and most other clients call itmcpServers. Copying an example between them without renaming that key is a common mistake.
Claude Desktop and claude.ai
Section titled “Claude Desktop and claude.ai”These use a custom connector.
- Open Settings > Connectors and click Add custom connector.
- Enter
https://your-domain.scifeon.cloud/mcpas the server URL and add the connector. - Click Connect and sign in to Scifeon in the browser window that opens.
- Scifeon asks whether to allow the access, naming the application and the address it will be sent to
(
claude.ai). Click Allow.
Scifeon then issues the connector a 30-day access key of its own - see Signing in.
Note: These clients reach Scifeon from Anthropic’s servers, so if your instance restricts access by IP address, those addresses have to be allowed first - contact support@scifeon.com. Claude Code and Visual Studio Code run on your own machine and are unaffected.
Troubleshooting
Section titled “Troubleshooting”invalid_requestinstead of the Scifeon sign-in page. Your instance does not yet accept the assistant’s sign-in address. Contact support@scifeon.com.- Unauthorized, or the assistant reports it cannot sign in. The 30-day key from signing in has probably expired - create the connection again.
- The client connects but has no tools. Check the URL ends in
/mcp, and that your instance name is spelled correctly. - A JSON-configured client treats the server as a local command. The entry is missing
"type": "http". - Copilot Studio cannot create or use the connection. A Power Platform data policy may restrict MCP connectors in your environment - ask your Power Platform administrator. If the connection is refused before it reaches Scifeon, the instance’s IP restrictions are the likely cause.
- Questions about results come back empty. The result tools need the Lab app bundle on your instance. Contact support@scifeon.com if you are unsure whether you have it.
- The assistant makes up record links. Report it to support@scifeon.com. Every row the server returns carries its own link, and the assistant is told to use those rather than build its own.