Installing Scifeon
Make sure you have followed the preparation steps before proceeding with this guide.
The following describes all steps involved in setting up a clean installation of Scifeon on Windows Server 2016.
Step 1: Deploy Scifeon
Section titled “Step 1: Deploy Scifeon”- Download the latest on-premises version of Scifeon here: Download Scifeon
- Unzip into the preferred path on the server, e.g.
c:\inetpub\scifeon\dev, where the last part of the path typically is the environment name.
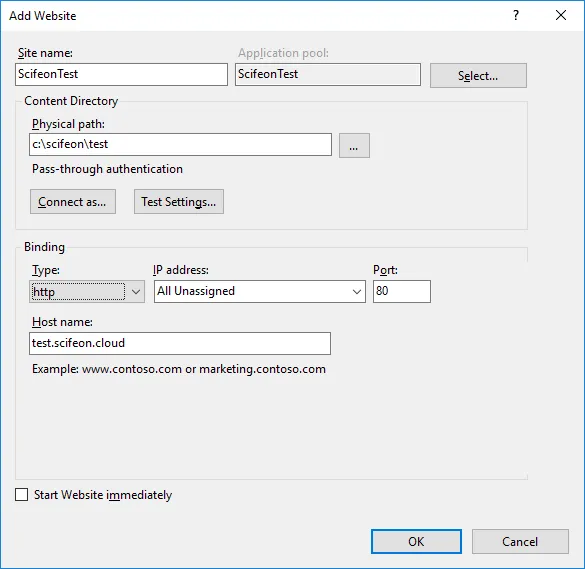
Step 2: Create a Web Site in IIS
Section titled “Step 2: Create a Web Site in IIS”- Open Internet Information Services (IIS) Manager.
- Right-click Sites and choose Add Website.
- Choose an appropriate name (typically a combination of instance name and environment).
- Set the Physical path in the Content Directory section to an path where you deployed Scifeon in step 1.
- Set the binding port and set DNS names in Host name.
- Remove the checkmark at Start Website immediately.
- Click OK.
NB: Scifeon doesn’t interact with the local filesystem, so Pass-through authentication is fine.
Example of Web Site settings:
Step 3: Configure Scifeon
Section titled “Step 3: Configure Scifeon”Create a new copy of the file appsettings.default.json with the name appsettings.json and update sections in the new file according to the sections below.
Set the instance name by updating the following information in the appsettings.json:
{ ... "ScifeonSettings": { "Instance": { "ID": "", // The name of this instance "Env": "", // E.g. dev, test, regulated, prod, etc. "Regulated": false // This is used to restrict runtime configuration of validated environments } }}Database
Section titled “Database”Update the following section with the server name, database name, usernames and password from the Installation Prerequisites:
{ ... "ScifeonSettings": { "Database": { "DBMS": "SqlServer", "Server": "", // The server name "Port": 1433, // The server port "Database": "", // The database name "User": "", // The username of the read/write user "Password": "", // Password for the read/write user "UserDDL": "", // The username of the read/write/alter user "PasswordDDL": "", // Password for the read/write/alter user "Parameters": "MultipleActiveResultSets=True;Integrated Security=False;" }, }}Security
Section titled “Security”Update the Key to a 32B key (length of 32 characters) in the following section, and make sure never to overwrite this in future upgrades, as this is used to store sensitive information in the database, e.g. the email password from the section above. There are many online tools to generate random strings. Just make sure the length is 32 characters.
{ ... "ScifeonSettings": { "Security": { "Authentication": { "Windows": false, "AllowInsecureBasic": false // Only used for the OData endpoints. Basic authentication only works through https if false }, "Key": "CHANGE-THIS-IN-PRODUCTION-32BYTE" // This is used for symmetric encryption }, }}Windows Authentication (optional)
Section titled “Windows Authentication (optional)”To use Windows Authentication we need to enable Windows Authentication in both IIS and in Scifeon:
Step 1: Enable in IIS
Section titled “Step 1: Enable in IIS”- Open Internet Information Services (IIS) Manager.
- Select the Scifeon Web Site created previously.
- Double-click Authentication.
- Enable Widnows Authentication (and make sure Anonymous Authentication is also enabled).
Step 2: Enable in Scifeon
Section titled “Step 2: Enable in Scifeon”Open the appsettings.json file and update the following section to match:
{ ... "ScifeonSettings": { "Security": { "Authentication": { "Windows": true } } }}Step 3: Verify user
Section titled “Step 3: Verify user”After Scifeon has been started (the next step), go to http://{scifeon}[:port]/api/auth/user on a client and verify that contextUser is the currently logged on Windows user.
Step 4: Start Scifeon
Section titled “Step 4: Start Scifeon”- Select the Web Site created in IIS in step 1.
- Click Start in the section Manage Website.
- Open the following URL: http://{scifeon}[:port]/api/user/bootstrap
- Go to the the frontpage of Scifeon: http://{scifeon}[:port]/ (http://{scifeon}[:port]/#/login if Windows Authentication has been enabled).
- Login with the username admin and password 12345678 and change the password to something else after login.