Installing Printer
Installation (Windows)
Section titled “Installation (Windows)”Scifeon supports several approaches for printing labels to Zebra printers:
- Zebra Browser Print (per-computer): Install Zebra Browser Print on each computer that needs to print. Follow the steps below.
- Scifeon Print Server (centralised): Install the Scifeon Print Server on a server in your company so all computers can print without a local installation. The print server supports two modes that can be used separately or together:
- Zebra Browser Print proxy: Zebra Browser Print is installed on the server, and the print server proxies requests to it.
- Manual Printers: Zebra printers are configured directly in Scifeon and the print server communicates with them over TCP/IP. Zebra Browser Print is not required on the server in this mode.
The installation of the Scifeon Print Server is described at the end of this article.
1. Download and Run Installer
Section titled “1. Download and Run Installer”- Download the installer for Windows: Zebra Browser Print Download Page
- Run the installer executable
ZebraBrowserPrintSetup-1.3.X.exe. - Select where you would like to save the Browser Print files and click
Next.
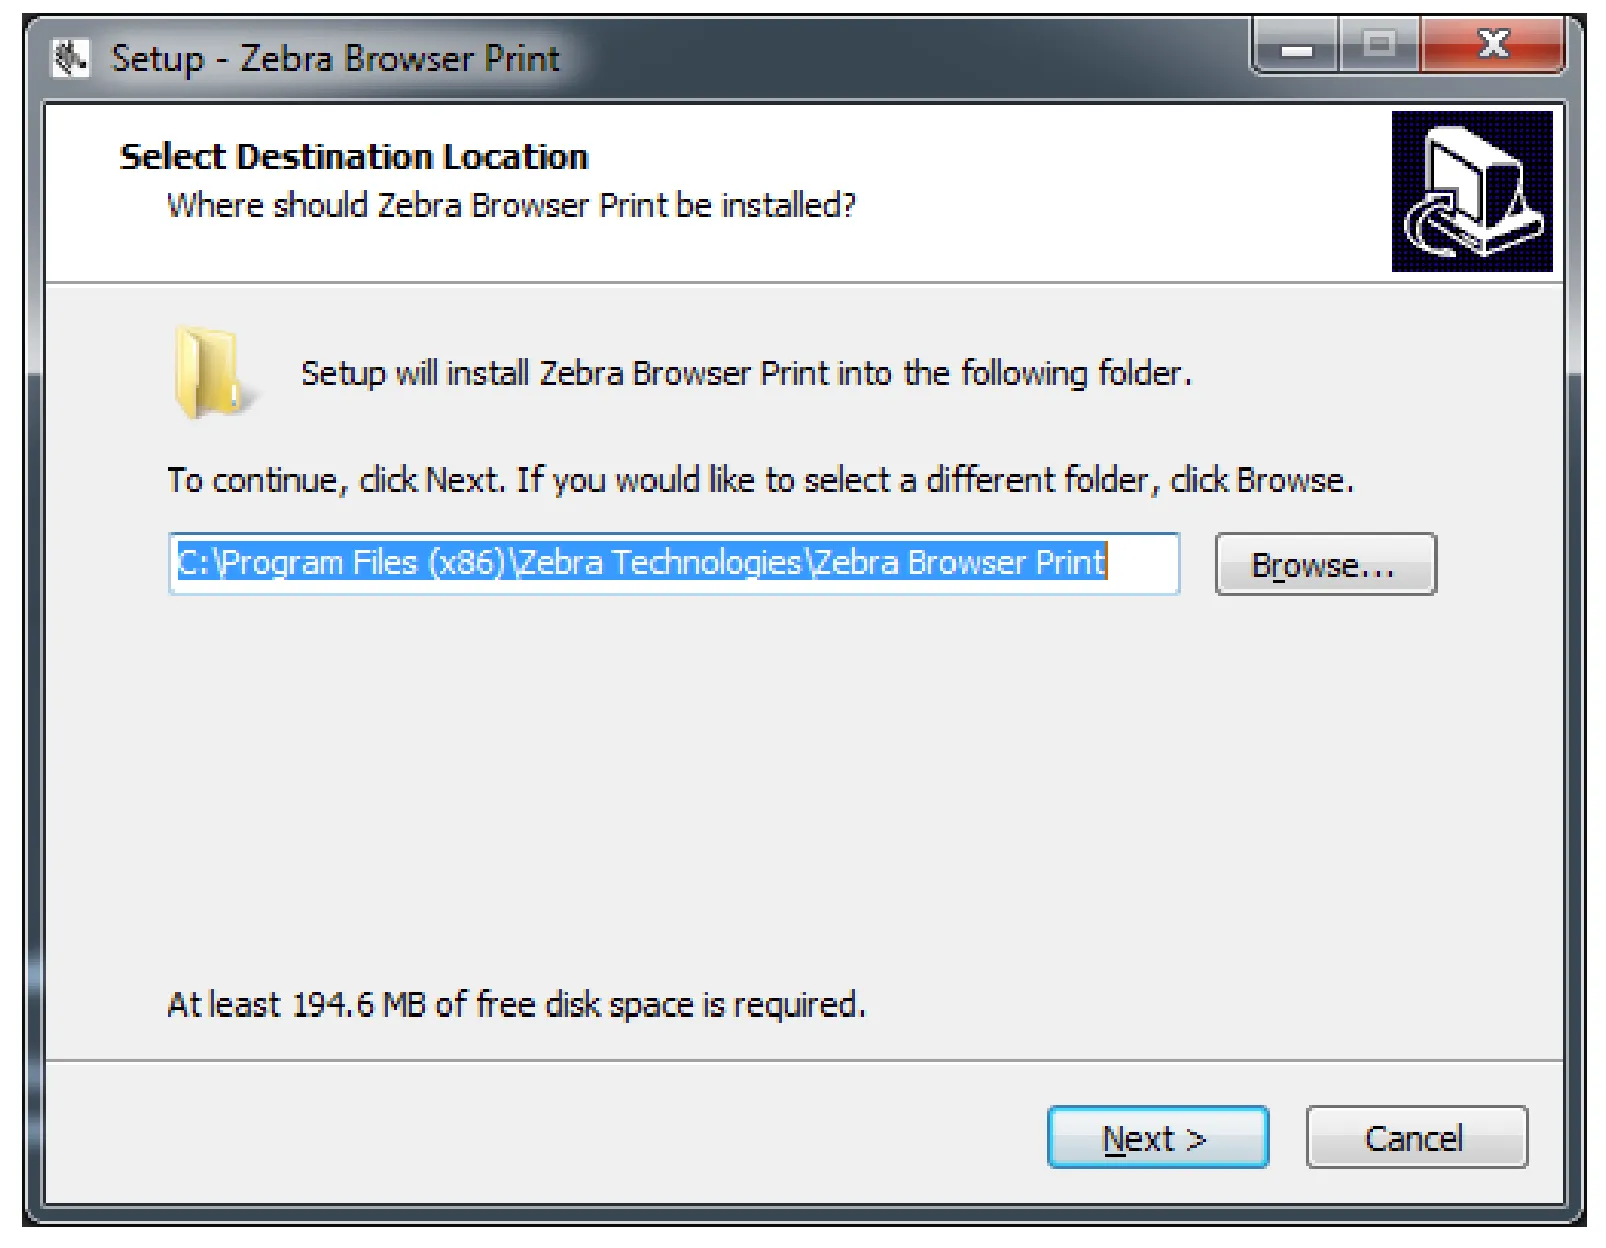
- Select where you would like to run the program from and click
Next.
2. Desktop Icon Option
Section titled “2. Desktop Icon Option”- Decide if you want to have a desktop icon for Browser Print and click
Next.
![]()
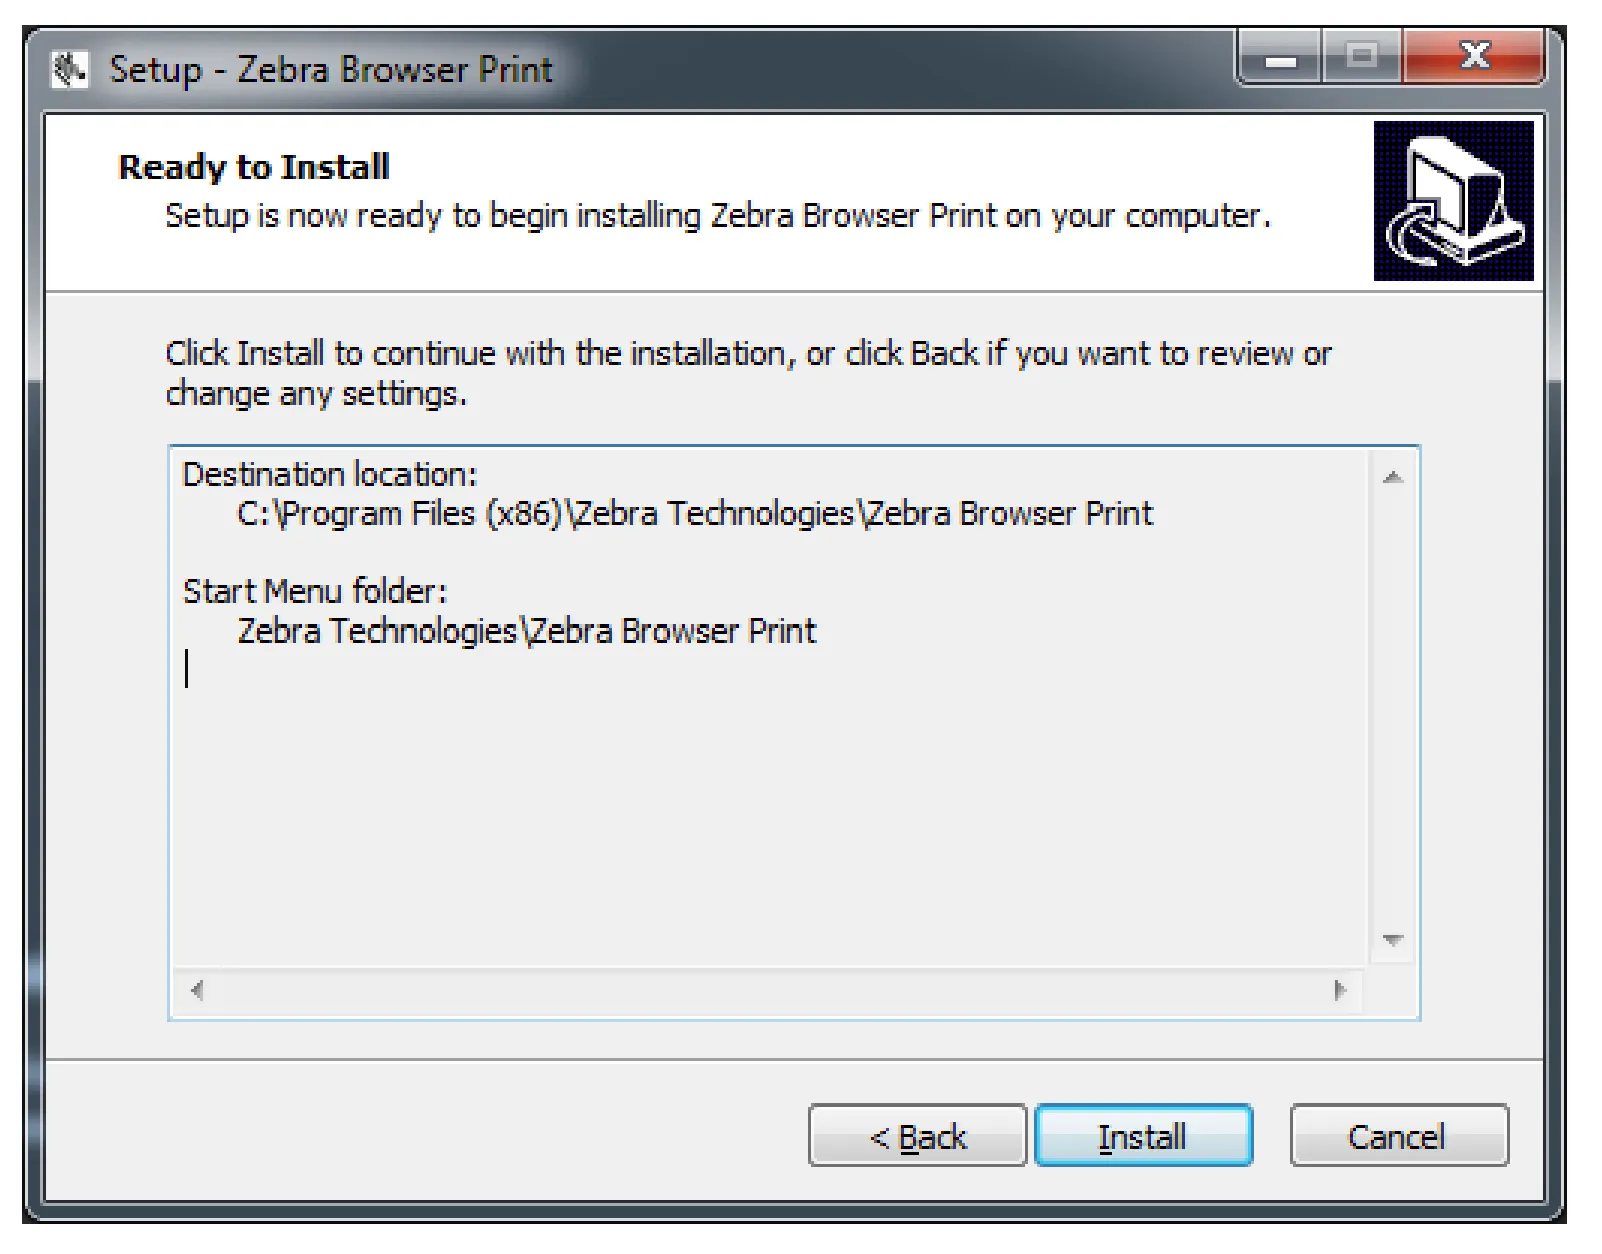
3. Installation Process
Section titled “3. Installation Process”- Click
Install.
- Check the box to launch Zebra Browser Print and click
Finish. If you do not check the box, Zebra Browser Print will be launched the next time you restart your computer.

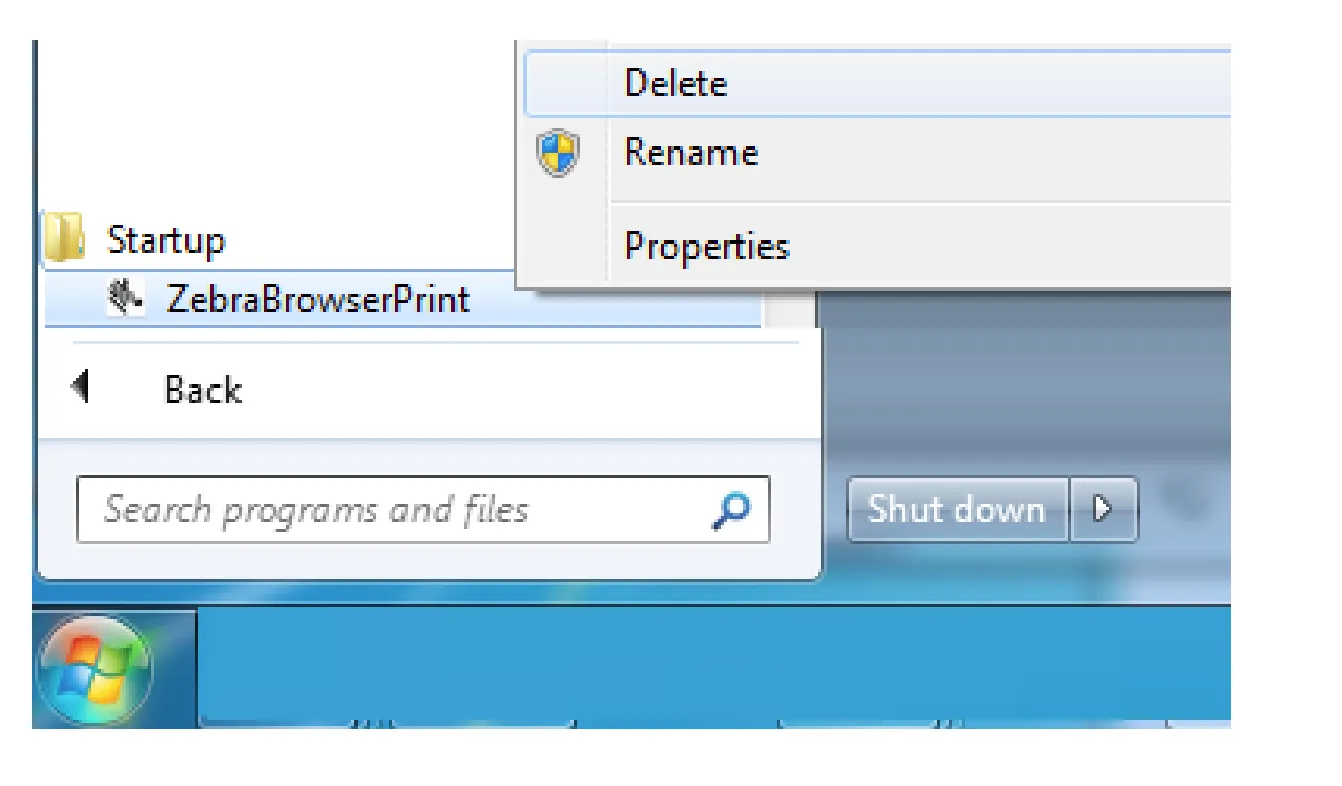
- Note: The Windows installer adds a shortcut to the
startupmenu automatically. This feature will ensure that Browser Print runs when the computer is restarted. You can remove this feature by right-clicking on the shortcut in the startup menu. Browser Print will only work when started manually without the entry instartup.
4. Accept License Agreement
Section titled “4. Accept License Agreement”- When the program runs for the first time, the End User License Agreement will pop-up. Select
I Agree.

5. Browser Communication Confirmation
Section titled “5. Browser Communication Confirmation”- A pop-up about communicating with a web browser will appear. Click
OK.
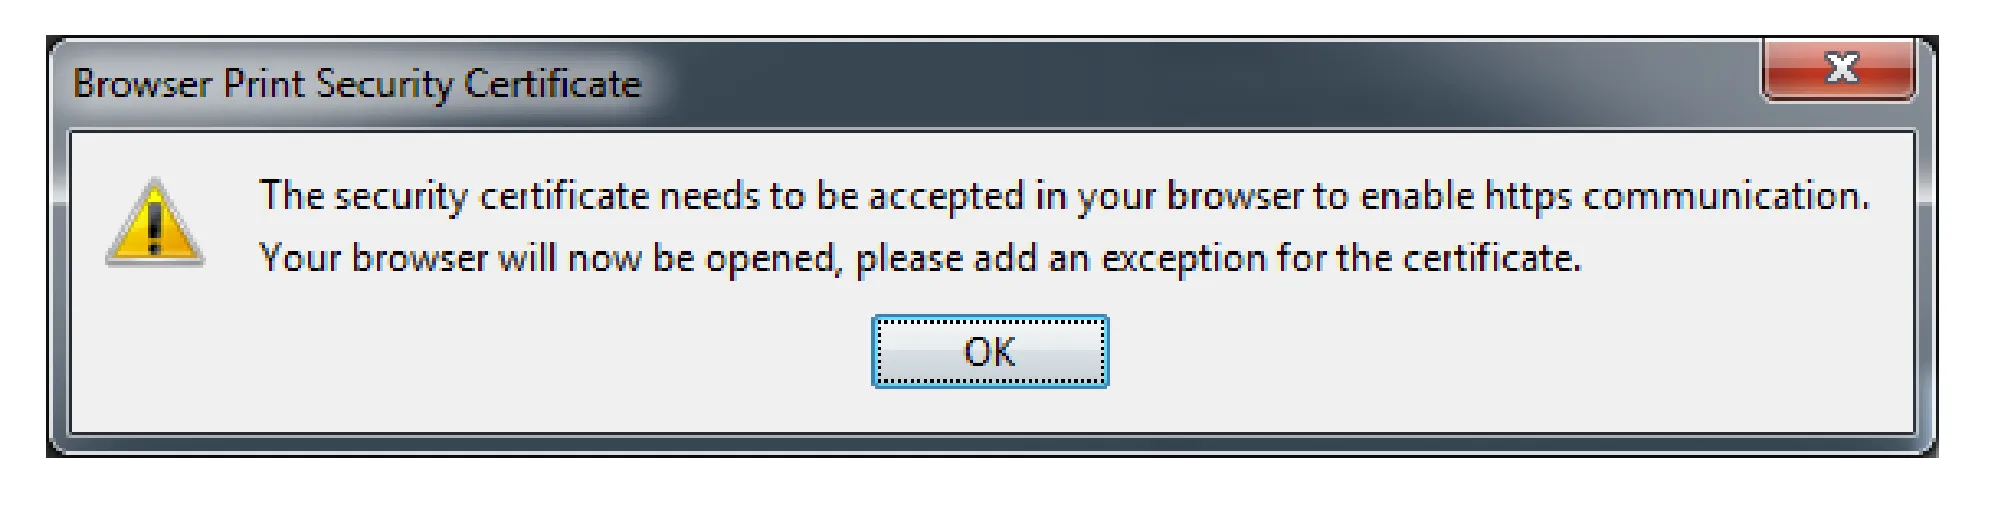
- A pop-up will appear requesting access to any connected Zebra devices. Select Yes.
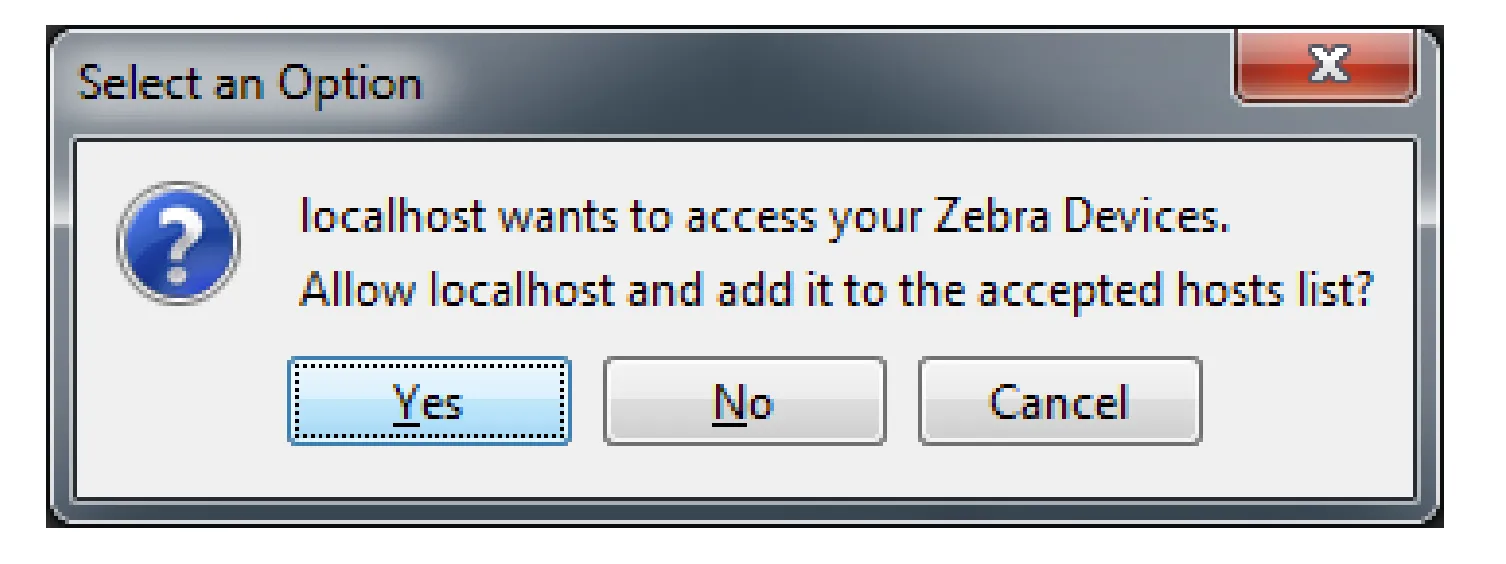
- In a web browser, it displays that the SSL Certificate has been accepted. This can be closed again.

6. System Tray Icon
Section titled “6. System Tray Icon”- A Zebra logo icon will also appear in your system tray this indicates that Zebra Browser Print is running.
Running Browser Print
Section titled “Running Browser Print”1. Access Settings
Section titled “1. Access Settings”- Right-click (WIN) on the Zebra logo icon in the system tray and select
Settings. Browser Print’s settings will open.

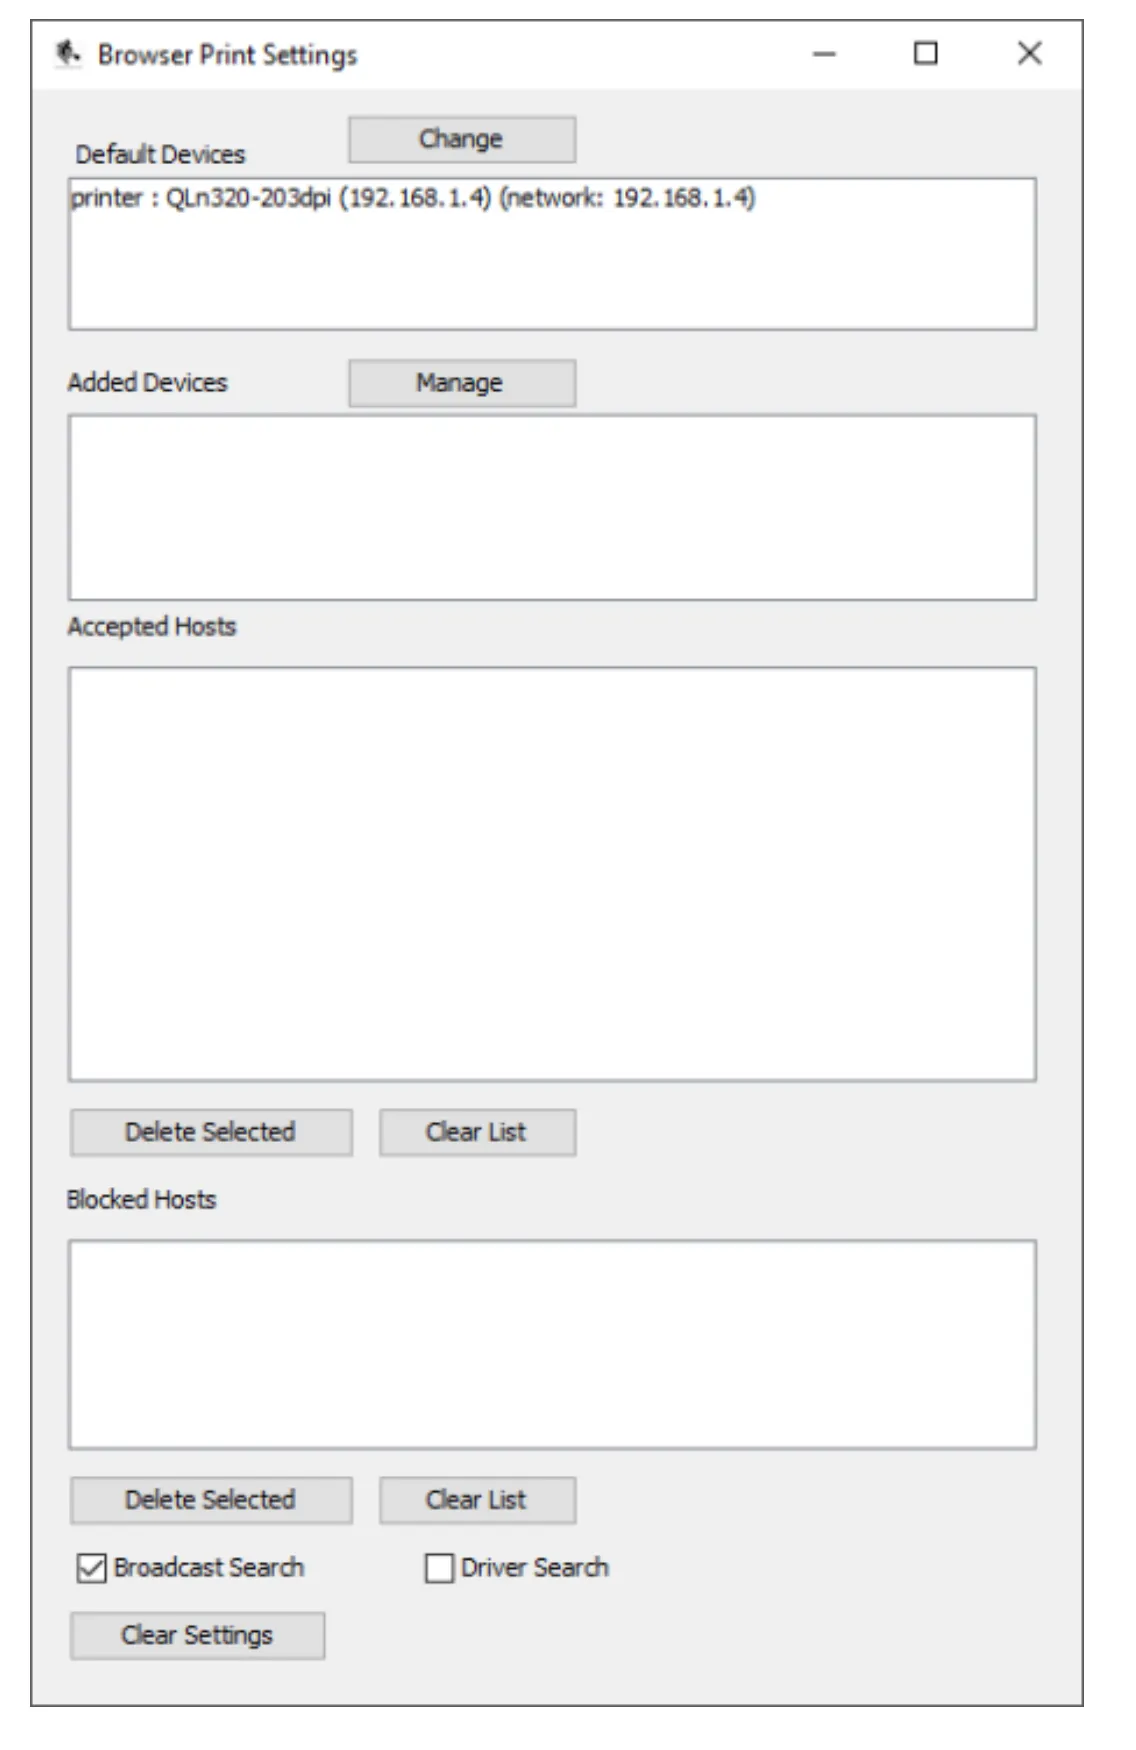
2. Configure Settings
Section titled “2. Configure Settings”- Default Devices Lists the default device set for this user. This is different than the default printer set by the operating system. This can be changed once set via the
Changebutton or via script. - Added Devices Lists the devices that have been manually added by the user. These can be modified by clicking the
Managebutton. - Accepted Hosts Lists web addresses that the user has allowed access to their devices. These can be removed using this screen.
- Blocked Hosts Lists web addresses that the user has blocked access to their devices. These can be removed using this screen.
- Broadcast Search Selection box allows Zebra Browser Print to find and print on network connected Zebra Printers.
- Driver Search The application will display installed drivers in the discovered printer response.
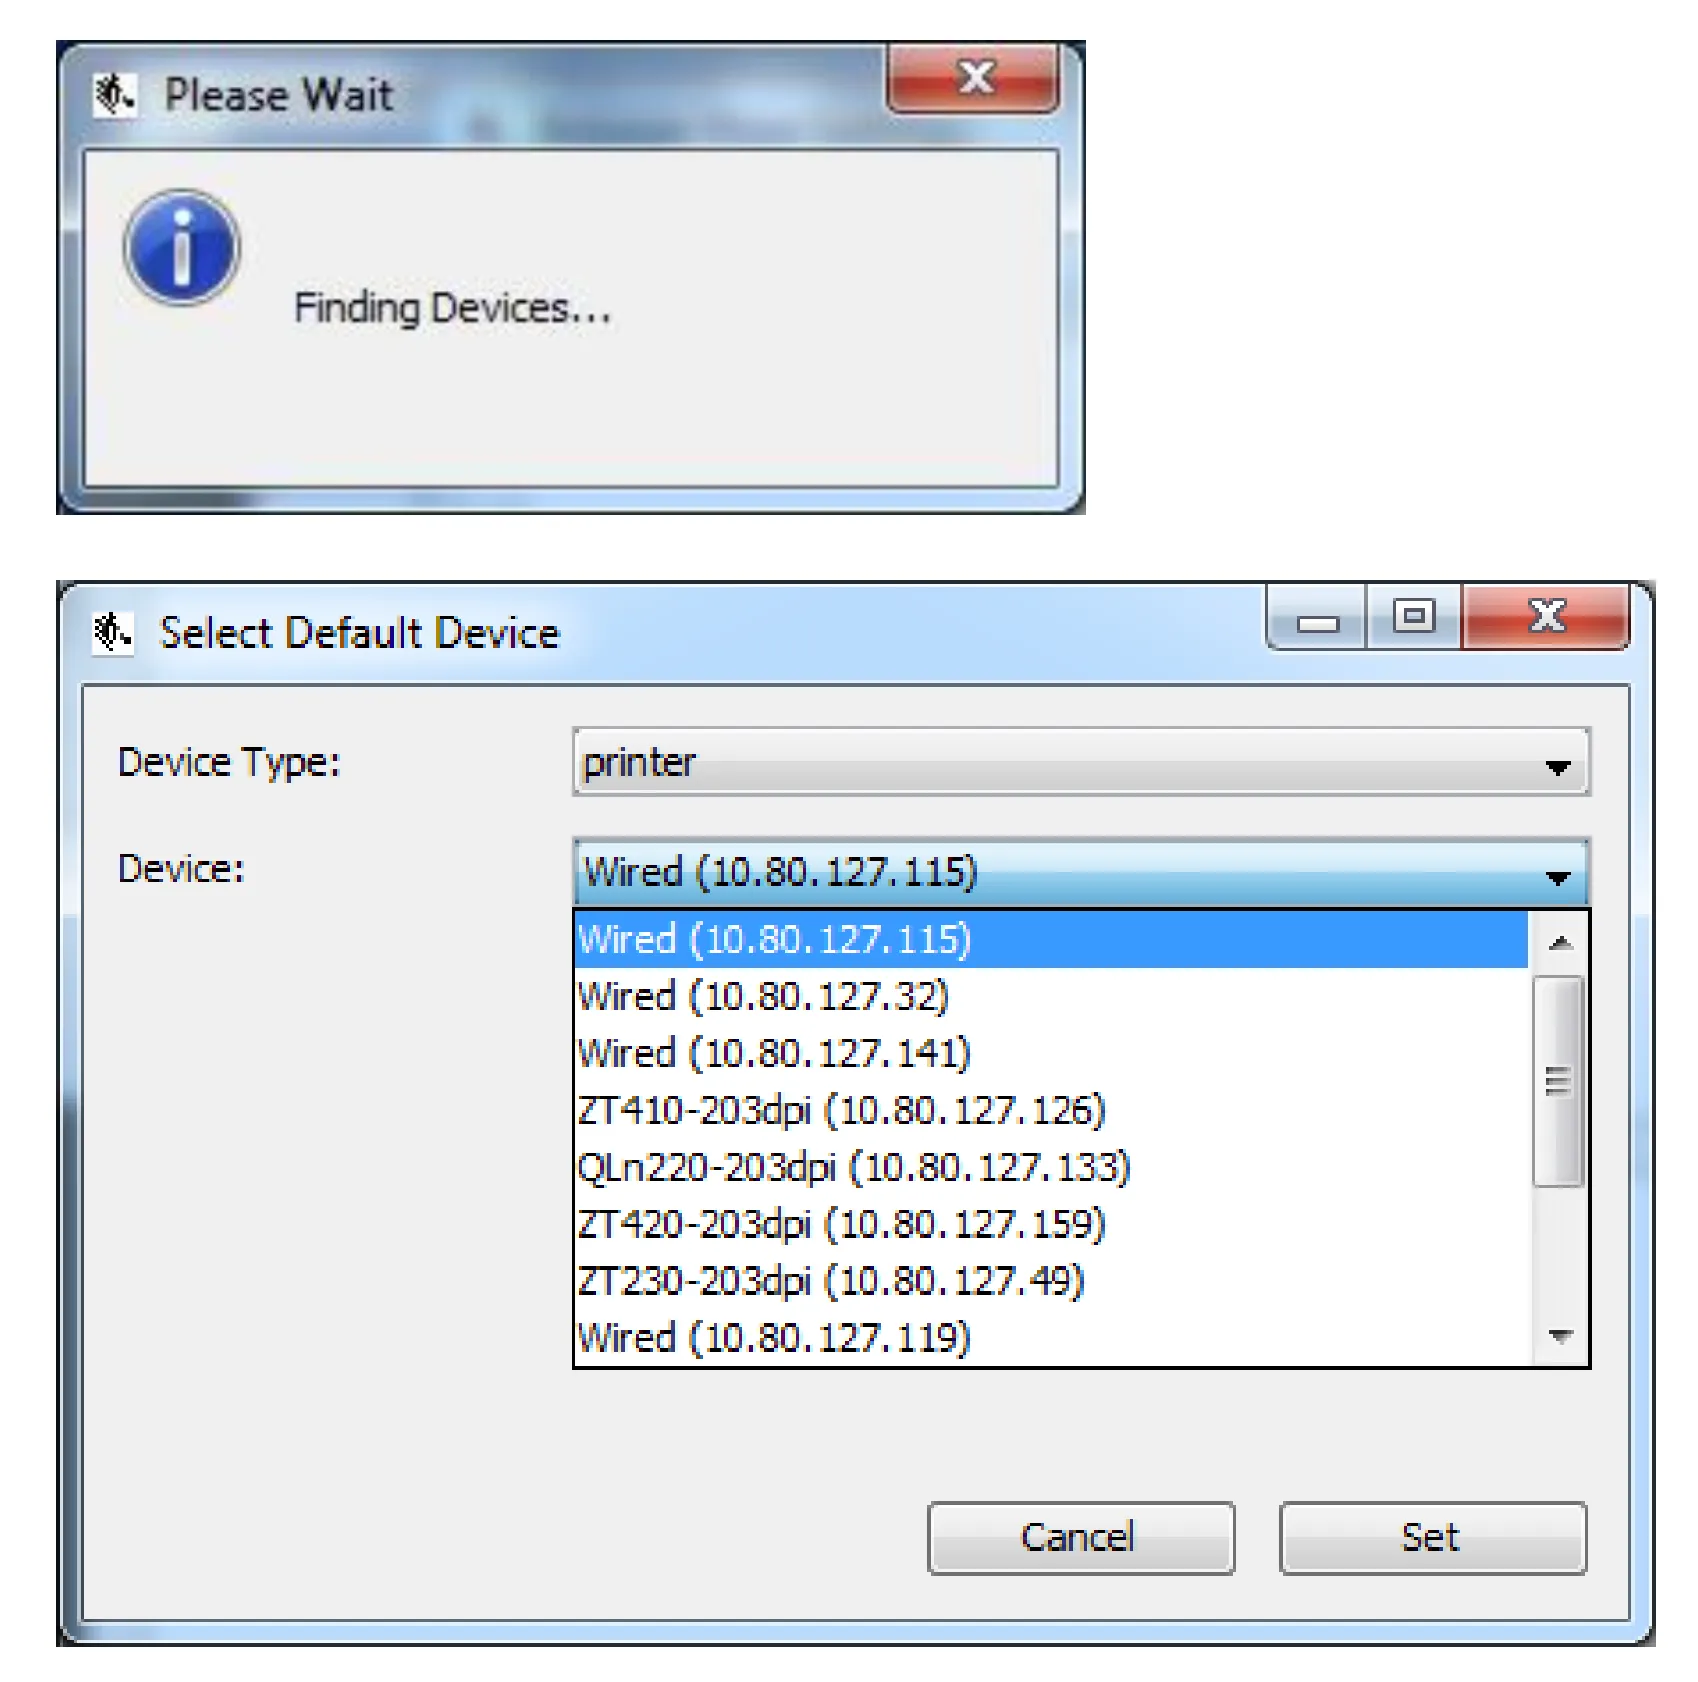
3. Set or Change the Default Printer
Section titled “3. Set or Change the Default Printer”- To set or change the default printer, click the
Changebutton. A pop-up will appear with a dropdown of all discoverable devices (finding network connected Zebra printers may take a few moments). Select the device you would like to print to by default and clickSet.
4. Add Printer Manually
Section titled “4. Add Printer Manually”- To manually add a printer, click the
Managebutton. To add a printer, fill out the Name, Device Address, and Port fields before clickingAdd. The device should appear in the list, and should be delivered as a discovered device.
5. Restarting Browser Print
Section titled “5. Restarting Browser Print”- For Windows: Start Menu -> Programs -> Zebra Technologies -> Zebra Browser Print
Installing Scifeon Print Server (Windows)
Section titled “Installing Scifeon Print Server (Windows)”You can install the Scifeon Print Server on a server in your company. This will allow all computers in your company to print to the Zebra Printers you have. To use this solution you must have a certificate (PFX) available for that server, otherwise the solution will not work as it is not allowed to connect to http from https, i.e. Scifeon is running at https://*.scifeon.cloud, and the Scifeon Print Server is running on one of your local servers, e.g. https://10.0.0.2/.
The steps to install the Scifeon Print Server are as follows:
1. Install Zebra Browser Print (Optional)
Section titled “1. Install Zebra Browser Print (Optional)”If you want to use the Zebra Browser Print proxy mode, follow the installation instructions above first. If you plan to use Manual Printers only, you can skip this step.
2. Download and Install Scifeon Print Server
Section titled “2. Download and Install Scifeon Print Server”- Download the installer by clicking here..
- Execute the installer.
- Open the folder where Scifeon Print Server is installed, typically
C:\Program Files (x86)\ScifeonPrintServer. - Add a certificate (PFX) and update
appsettings.jsonwith the certificate path and password. This is required to be able to communicate from *.scifeon.cloud in the browser with the local print server. Inappsettings.jsonthe default port (4444) can also be changed. - Restart the Scifeon Print Server: Open Services, find
ScifeonPrintServerand restart it. - Open your Scifeon cloud instance and navigate to Administration > Labels & Barcodes and add the server address to the Print Server Host field:

3. Configure Zebra Browser Print (Optional)
Section titled “3. Configure Zebra Browser Print (Optional)”If you installed Zebra Browser Print in step 1, open its settings on the server and add all printers.
Also add the server address to the Accepted Hosts list by accessing the Print functionality in Scifeon from the domains you want to allow. The server address will be added to the list when accepted. To do so, do the following:
- On any computer, open Scifeon and navigate to the Print functionality.
- Print a label.
- On the server, accept the host.
- Do this for all domains you want to allow, i.e. https://my-compay.scifeon.cloud, https://my-company-test.scifeon.cloud, etc.
4. Configure Manual Printers (Optional)
Section titled “4. Configure Manual Printers (Optional)”As an alternative to Zebra Browser Print, you can configure Manual Printers directly in Scifeon. Manual printers communicate with your network-connected Zebra printers over TCP/IP through the Scifeon Print Server, without requiring Zebra Browser Print to be installed on the server at all.
This is the recommended approach when:
- You want a simpler server setup without Zebra Browser Print
- You have network-connected Zebra printers accessible from the print server
- You want all printer configuration managed centrally in Scifeon
Adding a Manual Printer
Section titled “Adding a Manual Printer”- Navigate to Administration > Labels & Barcodes.
- Scroll to the Manual Printers section.
- Click Add Printer.
- Fill in the details:
- Name – A descriptive label for the printer (e.g.
Lab Printer 1). - IP Address – The network IP address of the Zebra printer.
- Port – The TCP port used by the printer (default for Zebra printers is
9100). - Max Label Size (optional) – The maximum label dimensions (width and height in mm) the printer supports. When set, Scifeon will warn you if a selected label template exceeds these dimensions.
- Name – A descriptive label for the printer (e.g.
- Click Save.
The printer will now appear alongside any Zebra Browser Print printers when selecting a printer to print to.
How It Works
Section titled “How It Works”When a manual printer is selected, the Scifeon Print Server acts as a proxy between the browser and the printer. Instead of Zebra Browser Print, the print server opens a direct TCP connection to the printer’s IP address and port, and sends the ZPL commands directly.
- Print jobs are sent via the print server’s
/printendpoint. - Printer status checks are sent via the
/statusendpoint.
This means Zebra Browser Print does not need to be installed or running on the server when using manual printers.
Testing a Manual Printer
Section titled “Testing a Manual Printer”You can verify connectivity to a manual printer from the administration panel:
- Navigate to Administration > Labels & Barcodes.
- In the Manual Printers section, click Test next to the printer.
- The system will query the printer’s status and display the result. A successful response confirms the print server can reach the printer.